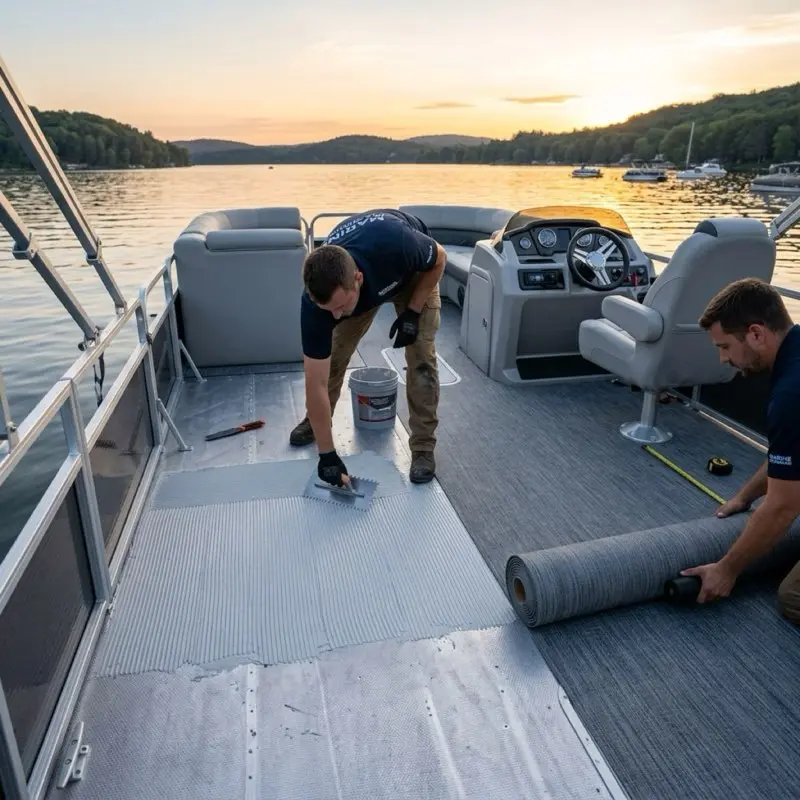
If you are currently standing in the middle of a stripped pontoon deck with a notched trowel in one hand and a gallon of generic outdoor carpet glue in the other, stop. Before you apply that adhesive, you need to understand that the bond between your flooring and your deck is the single most common failure point in a boat restoration.
I have seen $3,000 woven vinyl floors ruined in a single afternoon because the owner used a solvent-based contact cement that "outgassed" under the summer sun, creating giant, permanent bubbles that look like a topographical map of the Andes.
In the marine world, we don't just "stick things down." We manage chemical compatibility, hygroscopic expansion, and the thermodynamics of curing. In this guide, we are going to dive into the technical details of marine adhesive chemistry so you can choose the right product for your specific deck material.
1. Water-Based vs. Solvent-Based: The Great Divide
The first choice you have to make is between a water-based adhesive and a solvent-based adhesive. This isn't just about "eco-friendliness"; it's about the physics of how the glue cures.
1.1 Water-Based Adhesives (The "Safe" Standard)
Most modern marine vinyl manufacturers (like Infinity or G-Floor) recommend a high-quality water-based adhesive like Henry 670 or DeckMate Marine Adhesive.
- The Chemistry: Water-based glues cure through evaporation. The water in the glue must be able to escape for the bond to set. This is why water-based glues are perfect for wood decks. Plywood is porous, allowing the moisture to be absorbed into the wood fibers and eventually evaporate.
- The Advantage: They are much easier to work with, have a longer "open time" (the window where you can reposition the vinyl), and produce zero toxic fumes.
- The Risk: If you use a water-based glue on a non-porous surface like an aluminum deck, the water has nowhere to go. It will stay trapped between the aluminum and the vinyl, leading to a "soup" that never cures and eventually develops mold.
1.2 Solvent-Based Adhesives (The "Permanent" Bond)
Solvent-based adhesives (often called contact cements) use volatile organic compounds (VOCs) to hold the adhesive resins in a liquid state.
- The Chemistry: These glues cure through a chemical reaction and the rapid "flashing off" of solvents. They create a much more aggressive, immediate bond.
- The Advantage: They are the only option for gluing flooring to aluminum or fiberglass decks. They are also superior for "wrapping" edges or gluing vertical surfaces where you need the material to stay put immediately without sliding.
- The Risk: "Outgassing." If you lay the flooring too early before the solvents have fully evaporated, the trapped gasses will expand in the heat, creating bubbles. Additionally, some aggressive solvents can actually melt the thin foam backing found on certain high-end woven vinyls.
2. Surface Preparation: The "Molecule" Clean
You can buy the most expensive glue in the world, but if your deck is dirty, it will fail. Adhesion is a molecular-level attraction, and even a fingerprint of oil can break that attraction.
2.1 Degreasing the Deck
If you are working with new plywood, you should be relatively safe, but if you are working with aluminum or old wood, you must degrease.
- The Acetone Wipe: Use a clean rag soaked in pure acetone. Wipe down the entire surface. This removes any manufacturing oils or residual waxes.
- Mechanical Abrasion: For aluminum decks, we recommend a light scuff with a 60-grit sandpaper. This creates "mechanical tooth", microscopic valleys for the adhesive to grab onto.
2.2 Moisture Content (The 12% Rule)
If you are gluing to plywood, the wood must be dry. We use a digital moisture meter to ensure the plywood has a moisture content of less than 12%. If the wood is damp, the glue will not penetrate the fibers, and the moisture will eventually push the glue away from the surface, causing delamination.
3. Application Technique: Notched Trowel Physics
One of the most common mistakes DIYers make is "painting" the glue on with a brush or roller. This is wrong.
3.1 The "Riddled" Coverage
You must use a notched trowel to create "ridges" of glue. As you lay the vinyl down and roll it, these ridges collapse and spread, ensuring 100% coverage without any "thick spots" that would take too long to dry.
- Woven Vinyl: Use a 1/16" x 1/16" x 1/16" Square Notch trowel. Woven vinyl is thin, and if you use a larger notch, the ridges will "telegraph" through the material, showing up as visible lines on your floor.
- Marine Carpet: Use a 1/8" x 1/8" x 1/8" U-Notch trowel. Carpet has a thicker backing and needs more adhesive to saturate the fibers.
3.2 The 100-lb Roller
I cannot stress this enough: YOU MUST ROLL THE FLOOR. After laying the vinyl into the adhesive, you must use a 75lb or 100lb flooring roller. This forces any trapped air out to the edges and ensures the adhesive is pressed into every microscopic pore of the deck and the flooring backing.
4. Environmental Constraints: The "Goldilocks" Zone
Adhesive chemistry is highly sensitive to the environment. If you glue your boat in the wrong conditions, the bond will be weak.
4.1 Temperature (60°F to 90°F)
- Too Cold (<60°F): The adhesive molecules become "sluggish." They won't flow into the pores of the wood, and the chemical reaction will stall. The glue may look dry but will peel off the first time you hit a wave.
- Too Hot (>90°F): The solvent or water will evaporate too quickly. This leads to "skinning over," where the top layer of the glue dries while the bottom is still wet. This prevents a proper bond and leads to immediate bubbling.
4.2 Relative Humidity
Humidity slows down the evaporation of water-based glues. If the humidity is over 70%, you need to double your "open time" before laying the vinyl. Conversely, in very dry desert environments, the glue can dry so fast that you can only apply small sections at a time.
5. Recommended Brands: The Pro Choice (2026)
Based on my years in the service department, here are the three products I trust:
- Henry 670 (Water-Based): The industry standard for plywood decks. It is incredibly forgiving and has a massive 2-hour window for repositioning.
- 3M Scotch-Weld 1357 (Solvent-Based): The "nuclear option." If you are gluing to aluminum or need a bond that will survive a hurricane, this is the one. It is expensive and toxic, but it is permanent.
- Weldwood Marine Contact Cement: A great "middle ground" solvent adhesive that is easier to find at local hardware stores. Excellent for wrapping edges.
6. The "Bubble" Repair: Emergency Protocol
What happens if you finish your deck and wake up the next morning to find a giant bubble?
- Don't Panic: If the glue is still relatively fresh (within 24 hours), you can often "vent" the bubble.
- The Needle Trick: Use a very fine hypodermic needle to puncture the center of the bubble. Use a heat gun (on low!) to warm the vinyl, then use a hand roller to push the air out of the hole. If necessary, you can even inject a small amount of fresh adhesive through the needle to re-prime the area.
7. Conclusion
Choosing the best adhesive for your pontoon isn't about finding the "strongest" glue; it's about finding the one that is chemically compatible with your deck and your flooring material. If you have a plywood deck, stick with a high-quality water-based marine adhesive. If you have an aluminum deck, you must go the solvent route.
Take your time with surface prep, use the correct notched trowel, and for the love of boating, rent a 100-lb roller. Your floor will look better, last longer, and won't turn into a bubble-filled mess the first time the sun hits the lake.
Stay safe, watch your "open times," and I'll see you on the water!
8. The "Green" Glue Warning: Why "Eco" Adhesives Often Fail
In recent years, many hardware stores have started pushing "VOC-Free" or "Low-Odor" adhesives. While these are great for indoor house renovations, they are often a disaster on a boat.
- The Re-Emulsification Risk: Many low-grade eco-adhesives are "water-soluble" even after they cure. If your pontoon deck gets soaked by a heavy storm or a malfunctioning livewell, the glue can re-emulsify (turn back into liquid).
- The Result: You step on your floor and feel the vinyl "sliding" under your feet.
- The Callahan Rule: Always ensure your adhesive is specifically labeled "Marine Grade" and "Water-Resistant once cured." If it doesn't say "Marine" on the label, don't put it on your boat.
9. Edge Sealing Lore: Preventing the "Wick"
The most common place for an adhesive failure to start is at the edges, under the aluminum fence rails or at the transom.
- The Wicking Effect: Water gets trapped under the fence rail. It finds the edge of the vinyl and "wicks" its way under the material via capillary action. This water eventually breaks the adhesive bond.
- The Pro Move: Before you reinstall your aluminum fencing, apply a thin bead of Marine Grade Silicone or Polyurethane Sealant (like 3M 4000UV) to the very edge of the vinyl. This creates a "Gasket" that prevents water from ever reaching the adhesive layer.
10. Summary: The Callahan Adhesion Checklist
- Identify your deck material (Plywood = Water-based; Aluminum = Solvent-based).
- Check wood moisture (must be <12%).
- Degrease with Acetone (essential for aluminum or Coosa board).
- Use a Notched Trowel (ensure even ridges, not a flat coat).
- Observe the "Open Time" (wait for the glue to get "tacky" but not dry).
- Roll it with 100 lbs of pressure to eliminate air pockets.
- Seal the edges with a UV-rated marine sealant.
If you follow these steps, your pontoon flooring will be a "once-in-a-lifetime" project, not an annual repair.
I'll see you at the ramp!