There is no worse feeling in boating than spending four hours at the sandbar with the stereo cranking and the blender running, only to find that your engine won't turn over when it’s time to head home. On a modern pontoon, the "House Load" (stereos, GPS, underwater lights, and refrigerators) is higher than ever before. If you are running all of this off a single starting battery, you are playing a dangerous game of Russian Roulette with your weekend.
The solution is a Dual Battery System. But simply connecting two batteries in parallel is not a solution, it’s a recipe for a double-dead battery.
As a marine service advisor, I’ve seen hundreds of DIY dual-battery "hacks" that resulted in melted terminal posts, fried alternator diodes, and localized electrical fires. To do this right, you must understand the physics of isolation, the chemistry of battery bank separation, and the overcurrent protection required for high-amp marine circuits.
In this guide, we are bypassing the "red wire to red wire" advice. We are going to break down the technical architecture of an Automatic Charging Relay (ACR), the math behind wire gauge selection (AWG), and the "Golden Rules" of marine grounding.
1. The Physics of Isolation: Why "Parallel" is Not the Answer
Many owners think that by simply connecting the positive terminal of Battery A to Battery B (parallel), they have doubled their capacity. While you have doubled your Amp-Hours, you have also created a single point of failure.
The "Weakest Link" Drain:
If Battery A develops a shorted cell or is simply older than Battery B, the healthy battery will constantly try to "charge" the dead one. This creates a parasitic loop that will drain both batteries to zero overnight. More importantly, if you drain your "bank" at the sandbar while listening to music, you have drained your starting power simultaneously.
The Goal of Isolation:
The objective of a professional dual-battery setup is to ensure that your Starting Battery is always 100% reserved for the engine, while your House Battery handles all the fun stuff. You want them to be connected when the engine is running (so the alternator can charge both) but physically separated the moment the engine stops.
2. Choosing Your Hardware: Manual Switch vs. ACR
There are two primary ways to manage two batteries on a boat. One requires you to be a genius; the other does the thinking for you.
Option A: The Manual Selector Switch (1-2-Both-Off)
This is the old-school standard. You manually turn a knob to "1" to start the boat, "2" to run the stereo at the sandbar, and "Both" to charge them while cruising.
- The Critical Danger: If you forget to switch from "Both" to "2" when you drop anchor, you will drain your starting battery. Even worse, if you accidentally turn the switch to "OFF" while the engine is running, you will create a "Load Dump" that will instantly fry the diodes in your outboard's alternator, a $800 mistake.
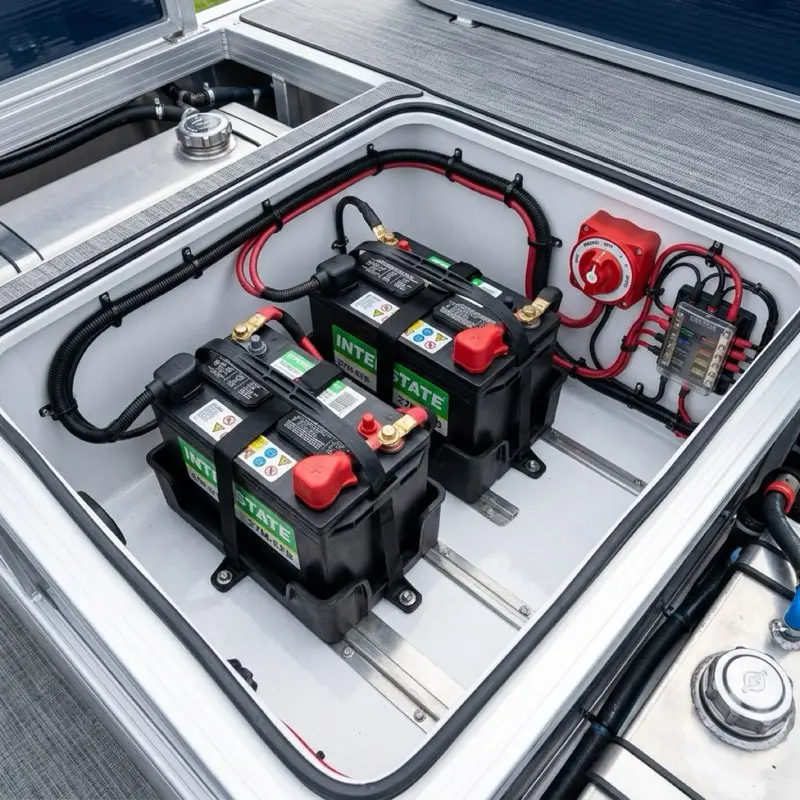
Option B: The Automatic Charging Relay (ACR)
This is the modern professional standard (pioneered by brands like Blue Sea Systems). An ACR is a "smart" solenoid that monitors the voltage of both batteries.
- How it Works: When the ACR senses a charging voltage (usually 13.0V+) from the engine, it automatically "combines" the batteries so they both get charged. The moment you turn off the engine and the voltage drops below 12.8V, the ACR "isolates" the batteries. You can drain the House battery to zero, and the Starting battery will remain perfectly untouched.
The Mike Callahan Verdict: For a pontoon boat, the Blue Sea Systems Add-A-Battery Kit (which includes a Dual Circuit Plus switch and an ACR) is the only system I recommend. It is foolproof and protects your alternator.
3. Battery Chemistry Isolation: Don't Mix Your Banks
One of the most common mistakes in dual-battery setups is mixing different battery types.
Starting vs. Deep Cycle:
- Starting Battery: Designed to deliver 800+ Cold Cranking Amps (CCA) for a few seconds. It has thin lead plates and should never be discharged below 80%.
- Deep Cycle Battery (House): Designed to deliver a steady stream of power (Amp-Hours) for a long time. It has thick lead plates and can be discharged to 50% repeatedly.
The "Mixing" Rule:
You can mix a Starting and a Deep Cycle battery if they are the same chemistry (e.g., both are standard flooded lead-acid). However, you should never mix a Lead-Acid battery with an AGM (Absorbed Glass Mat) battery in the same bank.
- The Charging Conflict: AGM batteries require a slightly different charging profile (Bulk, Absorption, and Float voltages). If they are combined via an ACR, the alternator will struggle to charge them both optimally, leading to one battery being chronically undercharged and failing prematurely.
4. Wire Gauge Selection: Defeating Voltage Drop
In a pontoon boat, the batteries are often at the very back (near the motor), but the "House" fuse panel is 20 feet away at the helm. This distance is the enemy of DC electricity.
Understanding Voltage Drop:
DC current loses pressure (voltage) as it travels through copper wire. If you use wire that is too thin, you might have 12.8V at the battery but only 11.5V at your GPS. This causes electronics to reboot, stereos to distort, and lights to flicker.
The AWG Standard:
For a dual-battery bridge (connecting the two batteries to each other and the switch), you must use a minimum of 2 AWG (American Wire Gauge) marine-grade tinned copper wire. If your outboard is 150HP or larger, we recommend 1/0 AWG.
- The Chemistry of Tinned Copper: Unlike automotive copper wire, marine wire is electro-plated with tin. This prevents the "wicking" of salt-air corrosion under the insulation. Untinned copper will turn into a green, high-resistance powder within two seasons in a marine environment.
5. Termination Physics: The Perfect Crimp
The #1 point of electrical failure on a boat isn't the wire itself, it's the termination (the lug at the end of the wire).
The "Cold Weld" Goal:
When you crimp a heavy 2 AWG lug, you are not just "squeezing" it. You are performing a mechanical cold-weld. Under a high-pressure hydraulic crimper, the individual copper strands and the lug itself are compressed until they form a single, solid block of copper.
- The Solder Myth: Do not solder large battery cables. Solder is brittle. In a vibrating boat environment, the solder will eventually develop hairline cracks, leading to high resistance and heat. Furthermore, solder wicks up the wire under the insulation, creating a "stiff" section that is prone to snapping under vibration.
Wire Stripping Technicalities:
When stripping 2 AWG or 1/0 AWG wire, use a specialized cable stripper. Never use a utility knife. If you nick even 5% of the copper strands while stripping the insulation, you have effectively reduced the gauge of your wire at its most critical point, the connection. This creates a "bottleneck" that will generate heat under high loads.
The Heat-Shrink Seal:
Always use Adhesive-Lined Heat-Shrink tubing. When heated, the internal glue melts and creates an airtight, waterproof seal around the wire-to-lug junction. This prevents salt air from entering the wire, which is the primary cause of "black wire disease."
6. Overcurrent Protection: Sizing the Fuses
Every positive wire that leaves your battery must be fused. This is not about protecting your radio; it’s about protecting the boat from a catastrophic fire.
The "Fuse for the Wire" Rule:
Fuses are sized based on the maximum current capacity of the wire, not the device at the end of it. If you have a 2 AWG wire capable of carrying 200 Amps, your fuse should be sized to blow before that wire reaches its thermal ignition point.
| Fuse Type | Max Amp Rating | Best Use Case |
|---|
| MRBF (Post Mount) | 300A | Main battery feeds; mount directly to post. |
| ANL (Block Mount) | 500A | Heavy amplifier feeds or trolling motor circuits. |
| MIDI / AMI | 200A | Secondary fuse blocks at the helm. |
The Replacement Protocol:
If an MRBF fuse blows, do not just replace it. A 100A fuse does not blow by accident. It means your positive cable has rubbed through its insulation and is shorting against the hull or a cross-member. Physically inspect the entire length of the cable before installing a new fuse.
7. The "Common Ground" Requirement
In a dual battery system, the two batteries must share a "Common Ground."
The Grounding Loop and RFI:
You must connect the negative terminal of Battery A to the negative terminal of Battery B with a heavy-gauge cable (the same gauge as your positive cables).
- Why it matters: Without a common ground, the ACR cannot accurately "sense" the voltage differential between the two batteries. Furthermore, a poor ground connection is the #1 cause of Radio Frequency Interference (RFI). If you hear a "whining" noise in your speakers that increases with engine RPM, check your common ground first.
8. Alternator Sizing and Duty Cycle
Before you add a massive 400Ah battery bank to your boat, you must consider if your engine can actually charge it.
The Alternator Limit:
Most mid-sized outboards (40HP to 115HP) have alternators that produce between 15 and 35 Amps. If you have a house bank that is 50% discharged (needing 200 Amps to refill), a 25-amp alternator would have to run at full output for eight hours to charge it.
- Heat Dissipation: Marine alternators are not designed for a 100% duty cycle at maximum output. If they are forced to push their maximum amperage for hours on end, they will overheat and fail. If you have a large house bank, you must supplement the engine's charging with an onboard shore power charger.
9. Shore Power Integration: Dual-Bank Chargers
If your boat stays at a dock, you should install a Multi-Bank Onboard Charger.
Isolated Outputs:
A quality 2-bank charger has two sets of isolated outputs. One set goes to the Starting battery, and the other goes to the House battery.
- The ACR Interaction: You do not need to disconnect the ACR when the charger is running. The charger will sense the voltage increase, and if it's powerful enough, the ACR will combine the batteries so they both receive a float charge.
10. Case Study: The 2,000-Watt "Island" Pontoon
I recently consulted on a 24ft pontoon that had three JL Audio amplifiers drawing a combined 180 Amps at peak volume. The owner had a single Group 24 starting battery. Every time the bass hit, the GPS would reboot because of voltage drop.
The Solution:
- We kept the Group 24 battery as a dedicated Start Only battery.
- We added two Group 31 AGM Deep Cycle batteries in parallel as the House Bank.
- We installed a Blue Sea 7610 SI-ACR.
- We ran 0/0 (Double Aught) wire from the batteries to the helm.
The Result: The owner can now blast the stereo for six hours at the sandbar, and the engine starts instantly every single time.
11. Troubleshooting the ACR: The "Chatter" Issue
Sometimes, you will hear your ACR clicking on and off rapidly (chattering). This is almost always a sign of a wiring problem.
The Low-Voltage Lockout:
If your house battery is severely discharged (below 10V), the ACR may refuse to combine it with the starting battery to protect the starting battery from a "massive surge" of current.
- The Fix: You must manually charge the house battery with a portable charger until it reaches at least 11.5V. Once it is within a safe range, the ACR will recognize it and allow the alternator to take over.
12. Battery Box Safety: Hydrogen Gas and Acid
Batteries aren't just heavy; they are chemical reactors.
The Venting Requirement:
Lead-acid batteries release hydrogen gas during the charging cycle. If you store your dual battery setup in an enclosed, non-vented compartment, you are creating a "Hydrogen Bomb." Ensure your battery boxes are properly vented to the outside air.
Acid Containment:
A battery box isn't just for organization; it's to catch electrolyte spills. If battery acid leaks onto your aluminum pontoon logs, it will cause rapid, catastrophic corrosion. Always use heavy-duty plastic battery boxes with secondary containment trays.
13. Maintenance: Preventing Terminal Corrosion
A dual battery system is a high-current environment. Even a small amount of corrosion at a terminal can create enough heat to melt the plastic battery casing.
The Protective Coating:
Once your connections are tight, spray every terminal and bus bar with CRC Battery Terminal Protector (the red spray) or apply a liberal coating of Lanocote. This creates an airtight barrier that prevents the salt-laden air from starting the oxidation process.
- The "Loose Nut" Danger: Check your battery terminal nuts every spring. The vibrations of a boat can loosen them over time. A loose connection is a high-resistance connection, which leads to heat, voltage drop, and eventually a fire.
14. The Physics of Resistance: Why Size Matters
Every connection point in your electrical system introduces a tiny amount of resistance (measured in Ohms). In a 12V system, even 0.1 Ohms of resistance is enough to cause a massive failure.
- Heat Generation: Resistance converts electrical energy into heat. If you have a loose terminal nut, that resistance will generate heat. At 100 Amps of flow, a loose nut can reach temperatures over 400 degrees Fahrenheit in minutes. This is why we use high-pressure crimps and locking nuts on all battery connections.
15. Conclusion
A dual battery setup is the ultimate "Quality of Life" upgrade for a pontoon boat. It transforms your boat from a source of anxiety ("Will it start?") into a true floating patio where you can enjoy your electronics without consequence.
By investing in a high-quality ACR system, using 2 AWG marine-grade tinned wire, and properly fusing every circuit at the battery post, you are building a system that will outlast the boat itself.
Take your time with the crimps, use heat-shrink tubing on every connection, and always double-check your grounds. Your future self, sitting at the sandbar with a cold drink and a cranking stereo, will thank you.
Stay safe, wire it tight, and I'll see you on the water!
16. EMI/RFI Noise Mitigation: The "Clean Power" Protocol
One of the most annoying side effects of a dual-battery system is "Line Noise."
- The Symptom: You hear a high-pitched whine in the speakers or see vertical lines on your fish finder that match the engine's RPM.
- The Cause: High-current devices (like the alternator or a refrigerator compressor) create electromagnetic interference that travels through the common ground.
- The Callahan Solution: You must install a Common Mode Choke or a Power Conditioner on the positive lead of your sensitive electronics (GPS/Fish Finder). More importantly, ensure your electronics are grounded to a dedicated Electronics Bus Bar, which is then grounded to the House Battery negative with a single, heavy-gauge wire to prevent "Ground Loops."
17. The 2026 Shift: Integrating Lithium (LiFePO4) House Banks
In 2026, the cost of Lithium Iron Phosphate (LiFePO4) has dropped enough that many pontoon owners are replacing their Lead-Acid House batteries with Lithium.
17.1 Can You Mix Chemistries?
Yes, but with caution.
- The Setup: Use a standard Lead-Acid or AGM battery for Starting (because Lithium can't handle the high-amp surge of a starter as well).
- The House Bank: Use a 100Ah or 200Ah Lithium battery for the House.
17.2 The DC-to-DC Charger Requirement
You cannot use a standard ACR to combine a Lead-Acid Starting battery with a Lithium House battery.
- The Physics: Lithium has a higher resting voltage (13.6V) than Lead-Acid (12.8V). A standard ACR will "think" the batteries are always being charged and will keep them combined, causing the Lithium battery to drain into the Lead-Acid one.
- The Fix: You must use a DC-to-DC Battery Charger (like the Victron Orion-Tr). This allows the engine to charge the Lithium battery at the correct voltage while providing 100% electrical isolation between the two banks.
18. High-Current Bus Bar Architecture
As your electrical system grows, your battery terminals will start to look like a "Birds Nest."
- The Danger: Stacked terminals create high resistance and heat. Most battery posts are only rated for 3 or 4 terminal lugs.
- The Solution: Use Heavy-Duty Bus Bars. Run one large 1/0 AWG wire from the battery to the bus bar, and then connect all your individual house loads to the bus bar. This ensures every device gets a high-current, low-resistance path to ground, and it makes troubleshooting significantly easier.
19. The "Engine-Off" Voltage Audit Protocol
Every spring, you should perform a "Voltage Audit" to ensure your system is healthy.
- Resting Voltage: With the engine off and everything disconnected, a healthy battery should read 12.6V to 12.8V.
- The "Stereo Load" Test: Turn on your stereo and all lights. Watch the voltage at the House Bank. If it drops below 12.0V in less than 30 minutes, your house battery is sulfated and needs replacement.
- The ACR Sense Test: Start the engine. Within 60 seconds, the voltage on the Starting Battery should rise to 13.5V+, and you should hear the "Click" of the ACR combining the banks. If the ACR doesn't click, check the "Sense" fuse on the ACR wiring harness.
20. Summary: The Electrical Margin of Safety
A dual-battery system isn't just about convenience; it's about Redundancy. In the marine world, redundancy is the difference between a minor annoyance and a Coast Guard rescue. By separating your "Start" and "Fun" power, you are building an electrical margin of safety that ensures you always have the energy to get home.
Wire it once, wire it right, and I'll see you on the water.