Outboard Trim and Tilt Not Working: The 5-Stage Diagnostic
AuthorMike Callahan
PublishedMay 6, 2026
Read Time19 min
UpdatedMay 6, 2026
Quick Brief
TL;DR Protocol
Your outboard trim won't go up, won't go down, or runs but does nothing. This expert guide walks you through every failure mode, from a $0 fix to knowing when you need a rebuilt unit, using a proven 5-stage diagnostic protocol.
UNIT-REF: BG-NAV-742
#outboard trim tilt not working#boat trim tilt stuck#outboard PTT diagnosis#trim motor runs but won't move#outboard trim tilt repair#boat trim stuck up#marine hydraulic trim system#power trim tilt troubleshooting
It happens at the worst possible moment. You pull into the ramp after a long day on the water, hit the trim switch to lift the engine, and, nothing. Or maybe it's the opposite: you're idling out of the marina at sunrise and the motor is stuck up at a 45-degree angle with no way to get it down.
Power trim and tilt (PTT) failure is one of the most common service calls I deal with at the shop. And I mean that literally, I've diagnosed this system hundreds of times across Mercury, Yamaha, Honda, Suzuki, Evinrude, and Johnson engines going back 25 years.
Here's what I know after all of that: most PTT failures get misdiagnosed because people jump straight to the expensive end of the repair tree. They replace the motor when it's the solenoid. They rebuild the hydraulics when it's low fluid. Or, the one that really gets me, they get towed in because they didn't know about the manual release valve, which would have gotten them home for free.
This guide will take you through every failure mode, in the right order, so you stop at the cheapest fix that actually solves your problem.
Mike Callahan's Field Note: "The symptom tells you everything. 'No sound at all' and 'motor hums but nothing moves' are two completely different problems. Knowing which half of the system is broken before you touch a tool cuts your diagnostic time, and your repair bill, in half."
System Layer
Component
Failure Cost Range
Control Circuit
Fuse / Switch / Wiring
$0 – $80
Relay/Solenoid
PTT Relays
$20 – $120
Electric Motor
12V PTT Motor
$80 – $350
Hydraulics, Fluid
Fill and bleed
$10 – $30
Hydraulics, Internal
Seal kit / Ram / Pump
$60 – $800+
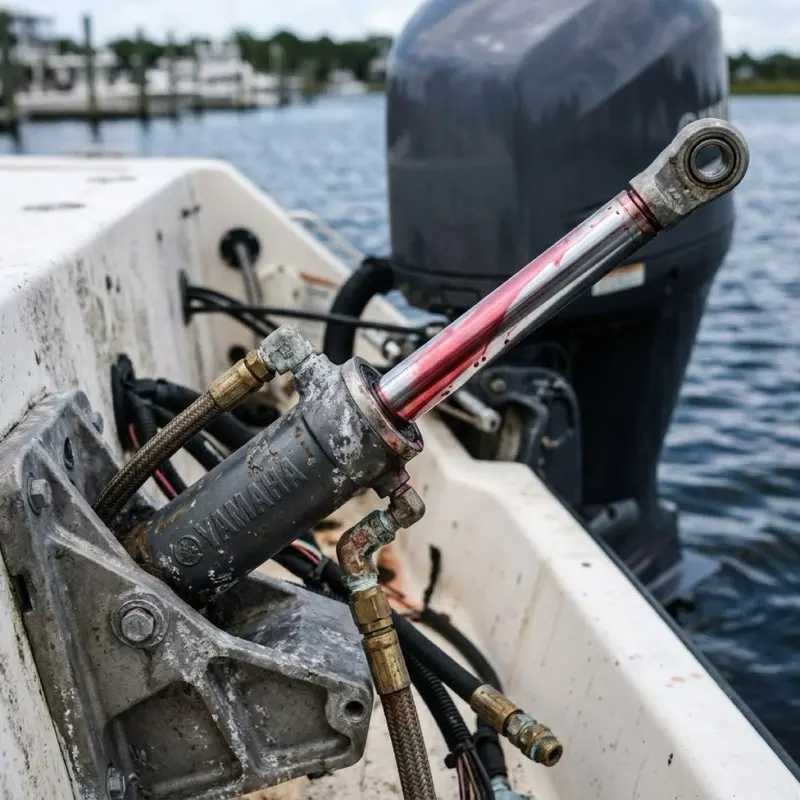
How the Power Trim and Tilt System Actually Works
Before you can diagnose it, you need to understand what you're diagnosing. The PTT system has two distinct halves: electrical and hydraulic. Most failures live in one half or the other, almost never both simultaneously. This distinction is the foundation of the entire diagnostic.
The Electrical Half
When you press the trim switch on your throttle or at the helm, you're sending a low-current signal through the switch wiring to a pair of relays (or solenoids). Because the trim motor draws 40+ amps when running, far more than a small switch can safely carry, the relays act as heavy-duty intermediaries. They use that low-current signal to close a high-current circuit between the battery and the motor.
There are typically two relays: one for UP direction and one for DOWN. Each is controlled by the corresponding color wire from the switch, conventionally blue for UP and green for DOWN on most brands. Both relays share the same high-current power feed directly from the battery or starter solenoid lug.
The Hydraulic Half
The electric motor spins a gear-type hydraulic pump submerged in or attached to a fluid reservoir. The pump forces hydraulic fluid under pressure into one of two chamber sets:
UP: Fluid pressurizes the bottom of the trim and tilt rams, extending the pistons and pivoting the engine away from the transom.
DOWN: The motor reverses, drawing fluid from the bottom chambers and forcing it into the top chambers, retracting the pistons and pulling the engine toward the transom.
When you release the switch, internal check valves trap the fluid in the cylinders, locking the engine in position. This is why a healthy system holds trim without any power.
SAFETY BEFORE ANYTHING
Never work on the hydraulic system, especially checking fluid level or inspecting rams, with the engine held up only by hydraulic pressure. Use the mechanical tilt support bracket. If your engine doesn't have one, use a wooden prop between the engine and transom bracket. Hydraulic pressure can fail suddenly.
Identify Your Symptom First, It Points to a Stage
Before running the full 5-stage diagnostic, identify which symptom you actually have. Each one points directly to a specific half of the system.
Your Symptom
Which Half is Failing
Start at Stage
Absolutely nothing, no sound, no movement
Electrical (control circuit)
Stage 1
A click, then nothing
Electrical (relay/motor)
Stage 2
Motor hums or runs, no movement
Hydraulic (fluid or pump)
Stage 3
Engine drifts or creeps down slowly
Hydraulic (seals or valve)
Stage 4
Stuck trim, need to move it now
Emergency manual release
Stage 5 first
Stage 1: The Control Circuit, Fuse, Switch, and Ground
For symptom: absolutely nothing, no sound at all.
When nothing happens, no click, no hum, complete silence, the failure is almost always in the low-current control circuit. This is where you start.
Step 1A: Check the Fuse
The PTT control circuit is protected by a fuse, usually 10A to 30A depending on engine brand and year. Find it before you do anything else.
On most engines the fuse is located:
In an in-line fuse holder (a small black plastic capsule) running from the battery area to the relay box
In the main fuse panel under the cowling, often near the starter solenoid
In the helm's auxiliary fuse panel (for the switch side)
Note: the power side of the trim motor (the high-current feed) is often unfused, it runs directly from the battery or starter solenoid lug. But the control side (the switch/relay signal circuit) is almost always fused. Replace a blown fuse with the exact amperage spec from your owner's manual. Upsizing a fuse because "it kept blowing" is how you turn a $5 problem into a wiring fire.
If the fuse blows again immediately: There is a short in the wiring or a seized trim motor drawing excessive current. Move to Stage 2 before replacing anything else.
Step 1B: Check the Battery Voltage
The PTT motor is hungry. At full tilt load, it can draw 50 amps or more from the battery. A battery that's fine for starting an engine, even one reading 12.4V at rest, can drop below the relay's minimum closing voltage under PTT load.
Check your battery voltage with a multimeter while pressing the trim switch:
12.0V or above under load: Battery is not the issue
Below 11.5V under load: Battery cannot sustain the current demand, charge or replace
Also check the main battery terminals and the ground connection at the engine block. Marine corrosion at a ground strap is a frequent cause of intermittent trim failure that disappears when you're at the shop and the tech wiggles everything.
Step 1C: Test the Trim Switch
Switch contacts corrode. This is especially true on tiller-handle switches and older helm-mounted joystick-style switches that were never sealed properly.
The quickest test: use jumper wires to briefly apply 12V directly to the relay input terminals (bypassing the switch entirely). Check your engine's wiring diagram for the correct relay signal terminal, typically one thin wire per relay from the switch, with a common ground. If the trim works when you bypass the switch, the switch is dead. Replacement is usually $20–$80 depending on brand.
Stage 2: The Relays, The Click-But-No-Move Diagnosis
For symptom: you hear a click, then nothing happens.
A click means good news: your switch and control wiring are working. The relay is receiving the signal and attempting to close. The failure is now between the relay and the motor.
Step 2A: Isolate Which Half of the Relay Is Failing
The relay has two circuits running through it:
Control coil (the click you hear), low current, confirmed working
Power contacts (the heavy current to the motor), this is where the failure is
Relay swap test: If both your UP and DOWN relays are identical part numbers (which is common), swap them. If trim now works in one direction but not the other, the swapped relay is confirmed bad.
Jumper test: With the battery disconnected, use a small wire to briefly bridge the relay's power input terminal to the motor output terminal. Reconnect the battery and press the switch. If the motor now runs, the relay's internal contacts are corroded or burned. Relay replacement is almost always under $30.
MARINE RELAY NOTE
The marine environment is savage to relay contacts. Salt-laden moisture creeps into the relay housing over years and creates a resistive layer on the copper contacts that the relay's internal magnet can't overcome. Don't just "clean" old relays, at $20–$30 each, replacement is the correct fix on engines over 5 years old.
Step 2B: Jump the PTT Motor Directly
This is the most important test in the entire electrical diagnosis. It tells you definitively whether the motor itself is good or dead.
Tools needed: Two jumper wires. One fully charged 12V battery (your boat's battery or a separate one).
Procedure:
Locate the wiring harness plug that connects from the relay box to the trim motor, it is typically located under the engine cowling near the mounting bracket. It will have two medium-gauge wires, usually blue and green.
Unplug the harness at this connector. You now have the motor wires isolated from all relay circuitry.
Using jumper wires connected to your 12V battery:
Touch +12V to the blue wire and ground to the green wire → motor should run UP
Touch +12V to the green wire and ground to the blue wire → motor should run DOWN
Interpreting the result:
Motor runs both directions when jumped directly: The motor is fine. Your problem is in the relays, relay wiring, or the connection between the relay output and this plug. Repair at the relay level.
Motor runs in one direction only: One armature winding in the motor has failed. Replace the motor.
Motor does not run in either direction: The motor is seized or dead. Replace the motor.
A PTT motor that passes the jump test but fails in normal operation almost always has a corroded connector or burned relay contact between the relay box and the motor plug.
Stage 3: The Hydraulic System, Fluid Level and the Air Bleed
For symptom: motor runs (you can hear it), but the engine won't move or barely moves.
If you confirmed the motor runs in Stage 2's jump test, and it also runs in normal operation but the engine won't move, you are now in the hydraulic half of the system. Congratulations: this is usually a cheaper fix than it sounds.
Step 3A: Check Hydraulic Fluid Level
Low fluid is the single most common cause of "motor runs, nothing moves." It is also the most satisfying repair: add fluid, system works.
The correct fill procedure:
Tilt the engine to the full UP position manually (use the manual release, see Stage 5, if the pump won't lift it) and engage the mechanical tilt support
Locate the fill screw or cap on the PTT unit, it's typically a large-slotted plug on the side of the assembly
Remove the fill plug. With the engine in the full UP position, correct fluid level is at the bottom of the fill port threads, you should see fluid right at the opening
If it's low, add the correct fluid slowly until fluid reaches the port
What fluid to use:
Use your manufacturer's branded power trim fluid when available (Mercury Power Trim & Steering Fluid, Yamalube Trim & Tilt Fluid, etc.). The widely-accepted alternative across most brands is Dexron III or Dexron VI ATF (automatic transmission fluid). It is the same viscosity profile and uses compatible seal chemistry.
Never use: brake fluid (destroys rubber seals immediately), power steering fluid (incompatible seal chemistry on most engines), or any fluid not listed in your service manual.
Step 3B: Bleed Air from the System
If fluid was low and you've just refilled it, or if you recently serviced the system, air in the hydraulic lines will cause weak, jerky, or completely absent movement even with a full reservoir.
Bleeding procedure:
Replace the fill plug securely
Run the trim switch through a complete UP-DOWN cycle, all the way up, all the way down
Repeat 5 to 6 complete cycles
Remove the fill plug again with engine in the full UP position and recheck fluid level, top off as needed
Repeat cycles until movement is smooth, consistent, and strong
A properly bled system will move the engine smoothly through its full range without hesitation. Jerky, stuttering movement after several cycles indicates either an air pocket that hasn't cleared, or the beginning of an internal pump problem.
Step 3C: Check for Milky or Contaminated Fluid
When you open the fill port, look at the fluid. It should be clear-to-amber in color, similar to fresh ATF.
Milky or cloudy fluid means water has entered the hydraulic circuit. This happens when:
Ram seals have degraded, allowing water to enter during submersion
The fill cap seal has cracked from UV exposure
The unit sat submerged (underwater storage or repeated swamping)
Water-contaminated fluid destroys the internal pump and valves through corrosion and incompressibility issues. The correct repair is to drain the entire system, flush with fresh fluid, refill and bleed. If milky fluid has been running for a long time, inspect the internal pump for scoring and the rams for corrosion pitting before calling the repair done.
Stage 4: The Hydraulic Internals, When the Engine Drifts Down
For symptom: trim holds for a few minutes then slowly sinks toward the transom.
A trim that "creeps down" means the system can build pressure but cannot hold it. The hydraulic check valves, the ones that trap fluid in the cylinders to maintain position, are leaking by.
There are three places this can happen:
4A: The Manual Release Valve
Before assuming the worst, check the manual release valve (the slotted screw on the side of the bracket, see Stage 5). If this valve is only slightly open, a quarter turn or half turn, it won't allow full movement but will allow slow fluid bypass. Tighten it firmly clockwise (snug, not overtorqued) and test.
This is the most common "creep" fix that nobody checks.
4B: External Ram Seals
Inspect the chrome trim rams, the shafts that extend when the engine raises. Run your finger along the chrome surface. You're checking for:
Visible hydraulic fluid weeping at the wiper seal (where the chrome meets the housing)
Rust spots or pitting, rough patches you can feel with your fingernail
Score marks (deep scratches across the shaft)
If the chrome is smooth and clean: Order a seal kit for your specific engine make, model, and year. The rebuild involves compressing the ram, removing the end cap, and replacing the O-rings, wiper seals, and backup washers. This is a DIY-possible job with patience and the correct service manual.
If the chrome is pitted or scored: A new seal kit will fail quickly because the rough surface tears the new seals as the ram moves. Replacement of the affected ram is the correct repair, not a seal kit.
4C: Internal Valve Body Failure
If the manual release valve is tight, rams look clean, no external leaks are visible, and the system still creeps, the failure is inside the pump/valve body assembly. This is where internal check valves have worn or debris has lodged in a seat.
At this stage, you have two practical choices:
Unit rebuild by a certified marine hydraulic shop (cost varies widely: $150–$400 plus parts)
Replacement unit, remanufactured PTT assemblies are available for most popular engines from brands like Tilt-Master, Parsun, and Sierra, typically $250–$600 depending on engine size
For engines over 10 years old with an unknown service history, replacement often makes more economic sense than a full rebuild.
Stage 5: The Manual Release, The Free "Get Home" Fix Everyone Should Know
For emergency use when the system fails on the water and you need to move the engine position.
This procedure gets you home when everything else fails. It works whether the trim is stuck up or stuck down. Every boater should know it before they need it.
The manual release valve is a large slotted screw hidden in a small access hole on the side of the engine mounting bracket. Its exact location varies by brand and year, but it is always on the bracket, not the engine itself, and usually on the port or starboard side facing aft.
BEFORE YOU OPEN THE VALVE
Support the engine mechanically. If the trim is stuck in the UP position and you open the release valve without support, 300+ pounds of outboard will drop fast. Block the engine with a wood prop or engage any available lock bracket before opening the valve even one turn.
The Manual Release Procedure
Tools needed: One large flathead screwdriver that fits the valve slot firmly. (Fit matters, a sloppy screwdriver will strip the slot.)
Locate the access hole on the mounting bracket
Insert the screwdriver into the slotted valve head
Turn counterclockwise, slowly, 2 to 3 turns. Do not remove the screw entirely
You may hear a hiss as hydraulic pressure equalizes
The engine can now be moved by hand, push or pull it to the position you need
Once in the correct position, turn the valve clockwise until snug, firm hand pressure, not overtorqued
The engine is now held in that position by re-trapped hydraulic pressure
Critical: Tighten the valve and engage your mechanical lock before running the engine. The manual release is not designed to hold the engine against running thrust. Running the engine with the valve open will cause the engine to pivot uncontrollably.
If the valve screw is seized: Spray penetrating oil into the access hole and wait 15 minutes. A hand impact driver (the type you strike with a hammer) is the most effective tool for breaking a corroded valve free without stripping the slot. If the slot is already damaged, a qualified mechanic can often extract it with a screw extractor or by carefully Dremel-cutting a new slot.
The Full Diagnostic Summary
Stage
What You're Testing
Cost If This Is the Fix
1A, Fuse
Blown fuse in control circuit
$1
1B, Battery
Insufficient voltage under load
$0 (charge) to $200 (replace)
1C, Switch
Corroded or failed trim switch
$20 – $80
2A, Relay
Burned relay contacts
$20 – $60 per relay
2B, Motor jump test
Confirms motor live or dead
$0 (test) to $350 (new motor)
3A, Fluid level
Low hydraulic fluid
$10 – $30
3B, Air bleed
Trapped air after refill
$0 (procedure only)
3C, Fluid condition
Water-contaminated fluid
$15 – $50 (flush and refill)
4A, Release valve
Valve slightly open
$0 (tighten)
4B, Ram seals
External seal failure
$40 – $120 (seal kit)
4C, Internal pump
Valve body failure
$150 – $600 (rebuild or replace)
Stage 5, Manual release
Stuck trim, need movement now
$0
When to Call the Shop
Work the stages in order. Most PTT failures resolve somewhere in Stages 1 through 3. Internal hydraulic failures (Stage 4C) require either a high level of mechanical confidence, a service manual for your specific engine, and hydraulic assembly experience, or a certified technician.
The two situations that always warrant a shop call:
The trim motor jump test fails and you see no obvious external damage, the motor may be seized due to corrosion-locked brushes, and the repair approach differs significantly from a simple motor swap
You've replaced the seal kit and the engine still creeps, scored rams are causing the new seals to fail immediately, and determining whether to rebuild or replace the ram assembly correctly requires a physical inspection
Frequently Asked Questions
My trim works going up but not going down, or vice versa. What does that mean?
Each direction is controlled by a separate relay. Trim works in one direction but not the other almost always points to a single failed relay, the one associated with the dead direction. Do the relay swap test described in Stage 2A.
My trim worked all week and now suddenly doesn't. No warning.
Sudden failure with no symptoms points to electrical. Check the fuse first, it's always the fuse first. A fuse that blows suddenly often does so because a relay contact burned out and drew excess current on its way to failure.
Can I use regular ATF from the auto parts store?
Dexron III or Dexron VI ATF is a widely-accepted alternative to manufacturer-branded power trim fluid for most outboard brands. It is the same viscosity range and uses compatible seal chemistry. Do not use brake fluid. Do not use power steering fluid unless your service manual explicitly approves it.
How often should I change the trim fluid?
Most manufacturers don't specify a change interval, the fluid is meant to be topped off, not routinely drained. However, inspecting the fluid annually for contamination (milky appearance = water intrusion) is good practice. If the unit has been submerged or the fluid looks wrong, drain and refill completely.
The trim holds fine underway but slowly droops at the dock overnight.
This is almost always the manual release valve leaking by slightly, or an external ram seal weeping under static load. Check the valve tightness first. Inspect the rams for any sign of fluid seepage at the wiper seals. If the overnight droop is consistent and gradual, you have a seal job ahead of you, but it won't leave you stranded on the water.
All diagnostic procedures in this guide reflect general PTT system architecture common to major outboard brands. Specific component locations, wire colors, fuse ratings, and fluid specifications vary by engine make, model, and year, always cross-reference with your engine's service manual. This guide is a diagnostic framework, not a replacement for manufacturer documentation or professional service judgment.