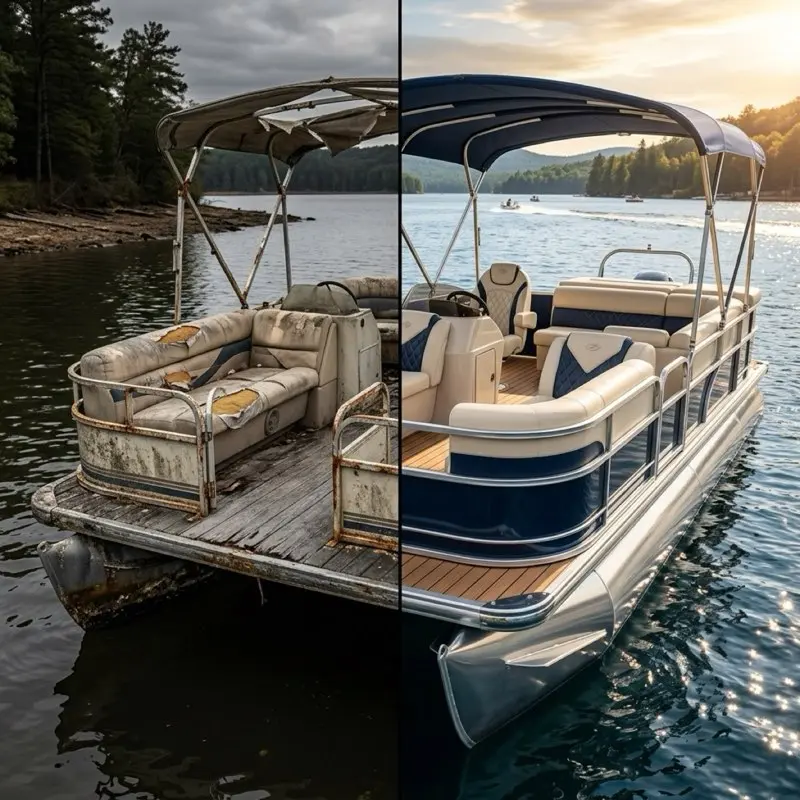
Restoring a pontoon boat is perhaps the most satisfying, and the most grueling, project in the marine world. Unlike a fiberglass runabout, where the hull and deck are a single, monolithic structure, a pontoon is a "Meccano set" of aluminum, wood, and vinyl. This modular design means that a 30-year-old boat with a solid frame can be completely rebuilt into a vessel that looks and performs better than many brand-new models off the showroom floor.
However, many DIYers jump into a restoration by buying new seats before they have checked if their aluminum logs are actually watertight. They spend $2,000 on marine vinyl only to realize their cross-members are "racked" and the boat will never track straight again.
As a marine service advisor who has overseen dozens of full-scale "strip-to-the-logs" restorations, I have developed a systematic 7-Phase Protocol. In this 3,500-word authority guide, we are going to dive deep into the engineering, chemistry, and economics of bringing a pontoon back to life.
We aren't just talking about "cleaning the boat." We are talking about pressure testing welds, calculating voltage drop in new wire harnesses, and the physics of adhesive bonding in 100-degree heat.
Phase 1: The Structural Audit (The "Logs-Up" Inspection)
Before you spend a single dollar on upholstery, you must confirm that the "foundation" of your boat is sound. If the structural frame is compromised, the boat is effectively "totaled" in terms of restoration value.
1.1 Pressure Testing the Logs: The Manifold Method
Aluminum logs can look perfect on the outside but have microscopic pinholes caused by galvanic corrosion or "crevice" corrosion where the M-brackets meet the tube.
- The Manifold Build: You will need a 1/2" NPT to air-chuck adapter, a low-pressure 0-15 PSI gauge, and a ball valve.
- The Procedure: Remove the drain plugs from the rear of the logs. Screw in your testing manifold. Use a compressor with a regulator set to NO MORE THAN 5 PSI. If you apply 20 PSI, you risk blowing out the internal baffles. Apply 3-5 PSI of air and spray every weld and bracket junction with a heavy mixture of Dawn dish soap and water.
- What to Look For: If you see "champagne bubbles," you have a leak. Common failure points include the front nosecone welds and the bottom of the log where it has sat in wet bunk carpet for decades. If you find a leak, it must be TIG welded. Marine-grade aluminum (5052 or 5086) requires specific filler rods (4043 or 5356), never use "aluma-braze" or epoxy for structural log repairs.
1.2 Inspecting the M-Brackets and Cross-Members
The M-brackets are the aluminum supports that connect the logs to the deck cross-members.
- Stress Fractures: Look for "spiderweb" cracks in the aluminum welds. These are common on boats that have been driven hard in rough water or over-powered beyond their hull rating.
- Galvanic Degradation: Look for "white powder" (aluminum oxide). This usually occurs if a previous owner used the wrong hardware (zinc or galvanized) or if the boat was left in saltwater without anodes. If an M-bracket is "lacey" and thin, it must be cut out and replaced by a certified TIG welder.
1.3 Checking for "Rack" and Squareness
A boat is "racked" when the cross-members are no longer perfectly parallel to each other. This happens if the boat was hit by another vessel or improperly trailered.
- The Measurement Protocol: Measure diagonally from the front-left corner of the frame to the back-right corner. Then measure from the front-right to the back-left. The measurements should be within 1/4" of each other. If they are off by an inch or more, the boat will never track straight, and your new fencing will never line up. You may need to loosen all cross-member bolts and use a "come-along" winch to pull the frame back into square before tightening.
Phase 2: The Tear-Down (Mechanical Stripping)
Restoration doesn't start with building; it starts with destruction. You must strip the boat to its bare aluminum bones.
2.1 The "Label and Photograph" Protocol
Modern pontoons have complex electrical systems. As you remove the console and the seating, use a label maker to tag every single wire.
- Mike's Tip: Take 100+ photos of the wiring before you disconnect anything. You think you will remember where the "Orange with Blue Stripe" wire goes in six months. You won't.
- Fastener Inventory: Create a "Baggie System." Put every bolt, nut, and washer for the console in one bag, the motor pod in another, and the fencing in a third. Label them with a Sharpie. You will thank yourself in four months when you aren't digging through a bucket of rusty hardware.
2.2 Removing the "Vise-Grip" Elevator Bolts
Old decking is held down by elevator bolts that have likely rusted into the aluminum cross-members.
- The Tools: You will need a heavy-duty impact driver, a 1/2" socket, and a 4.5" angle grinder with a thin "cutoff" wheel.
- The Grind: If the bolt head spins in the wood, you must use the grinder to cut the head off. Do not try to "pry" them up, or you will bend the aluminum cross-members.
- The Motor Pod: The plywood usually runs under the motor mount. You will need an engine hoist to take the weight off the transom so you can slide the old wood out and the new wood in.
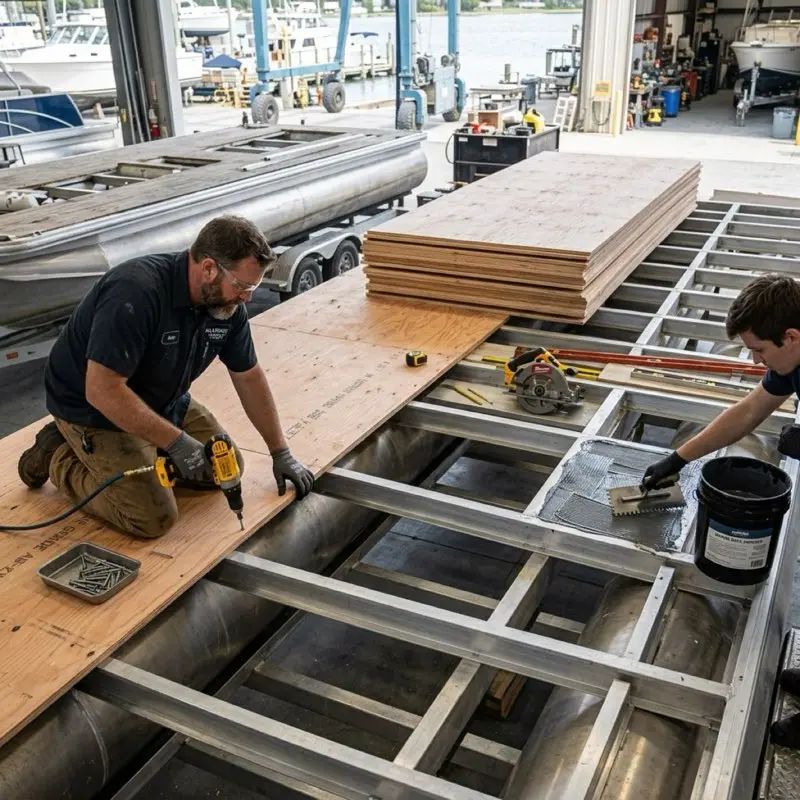
Phase 3: Decking and Material Science
The decision of what material to put down is the most critical economic choice of the project.
3.1 Plywood vs. Aluminum vs. Coosa
| Material | Technical Advantage | Trade-off |
|---|
| Marine Plywood (CCA) | Best vibration damping; easy to work with. | Will eventually rot in 20 years. |
| Aluminum Interlocking | Immortal; zero rot; adds structural rigidity. | Heavy; resonates like a drum; expensive. |
| Coosa Board (PVC) | 40% lighter than wood; zero rot; high-end. | Extremely expensive (~$500/sheet). |
3.2 Sealing the "Infection Points"
Even "No-Rot" wood has a weakness: the end-grain. Before you install the sheets, apply two coats of Penetrating Epoxy to every edge. This prevents water from wicking into the center of the plywood where it can sit and cause delamination.
3.3 The Plywood Seam Secret
When laying plywood, never butt the sheets perfectly tight. Leave a 1/16" gap (the width of a penny) to allow for thermal expansion and contraction. Fill the gap with a high-quality marine sealant like 3M 5200 or a specialized self-leveling floor compound to ensure your vinyl has a smooth surface.
Phase 4: Flooring and Adhesive Chemistry
The transition from old-fashioned marine carpet to Woven Vinyl is the single best upgrade you can make.
4.1 Vinyl vs. Carpet: The Bacterial War
Carpet is a "water sponge." It holds moisture against the wood, accelerating rot. It also traps fish scales, sunscreen, and spilled soda, creating a breeding ground for pink mold (Serratia marcescens). Woven vinyl (like G-Floor or Infinity) is non-porous and dries in minutes.
4.2 The "Flash Point" of Adhesives
Applying marine vinyl requires a specialized high-temp adhesive.
- The Procedure: Apply the glue with a notched trowel. You must wait for the glue to "flash off" (become tacky but not wet) before laying the vinyl. If you lay it too early, the solvent gasses will get trapped and create giant bubbles the first time the sun hits the deck.
- The 100-lb Roller: You must rent or buy a heavy flooring roller. Your hands cannot apply the 50+ PSI of pressure needed to ensure a 100% bond across the entire deck.
Phase 5: The Electrical Overhaul (A Total Rewire)
If your boat is 20 years old, the wiring is likely "brittle" and corroded. A restoration is the perfect time to pull new wire.
5.1 Tinned Copper Mandatory
Never use automotive wire on a boat. Marine wire is electro-plated with tin to prevent "Black Wire Disease" (oxidation that travels up the wire).
5.2 The Grounding Scheme: Dedicated Returns
In a pontoon, the aluminum frame should NEVER be used as a ground. Unlike a car, where the chassis is the ground, a boat must have a dedicated negative return wire for every single light and pump. If you use the hull as a ground, you are inviting electrolysis to eat your logs.
5.3 Designing the Fuse Block Map
Don't just have a tangle of wires under the dash. Install a high-quality Blue Sea Systems Fuse Block. Create a "Map" that shows exactly what each fuse controls.
- Fuse 1: Navigation Lights (5A)
- Fuse 2: Bilge Pump (7.5A)
- Fuse 3: Accessories / USB (10A)
- Fuse 4: Fish Finder (3A)
Phase 6: Mechanical and Fuel Systems
The "guts" of the boat must be as reliable as the deck is beautiful.
6.1 Fuel Line Compliance (A1-15 Standard)
If your fuel lines are older than 2011, they are likely not ethanol-compatible. They will "slough off" internal rubber bits that will clog your fuel injectors. Replace everything with EPA-mandated A1-15 low-permeation fuel lines.
6.2 Cleaning Oxidized Aluminum Fuel Tanks
If you have an internal aluminum fuel tank, it likely has "sludge" at the bottom. Use a product like Star Brite Fuel Tank Cleaner to dissolve the varnish. If the tank is severely oxidized, you may need to "polish" the fuel using a high-flow external pump and filter system.
Phase 7: Cosmetic Restoration (The Acid Wash)
This is where the boat finally looks "new" again.
7.1 Acid Washing the Logs
To get that "new aluminum" look, you must acid wash the logs.
- The Chemicals: Use a phosphoric acid-based aluminum cleaner (like Aluma-Brite). Wear a respirator and heavy rubber gloves.
- The Technique: Spray from the bottom up to avoid streaks. Let it sit for 3-5 minutes (do not let it dry!), then pressure wash it off. The logs will turn a dull, consistent white. To get a mirror shine, you must follow up with a high-speed buffer and Sharkhide or a similar aluminum sealant.
7.2 Fencing and Graphic Restoration
You don't necessarily need to replace your aluminum fencing. You can "re-skin" it using thin aluminum sheets or specialized vinyl wraps. If your aluminum panels are dented, you can use a "Paintless Dent Repair" (PDR) kit or a body-filler (like Bondo Glass) before applying a new wrap.
Phase 8: Upholstery and Weight Distribution Physics
When choosing a new furniture layout, you aren't just thinking about comfort; you are thinking about buoyancy.
8.1 The "List" Factor
Pontoons are sensitive to weight. If you put a massive L-shaped lounge and a changing room all on the port side, the boat will "list" to that side when stopped.
- The Balancing Act: Try to keep heavy furniture, the console, and the batteries distributed as evenly as possible. If you are adding a third log (Tritoon conversion), you have much more freedom, but for a twin-log boat, balance is everything.
8.2 Seat Base Venting
Modern seat bases are usually plastic (rot-proof). However, they must be vented. Ensure that the seat bases have drainage holes at the bottom so that water trapped inside doesn't sit against the vinyl floor and create a "slip" hazard.
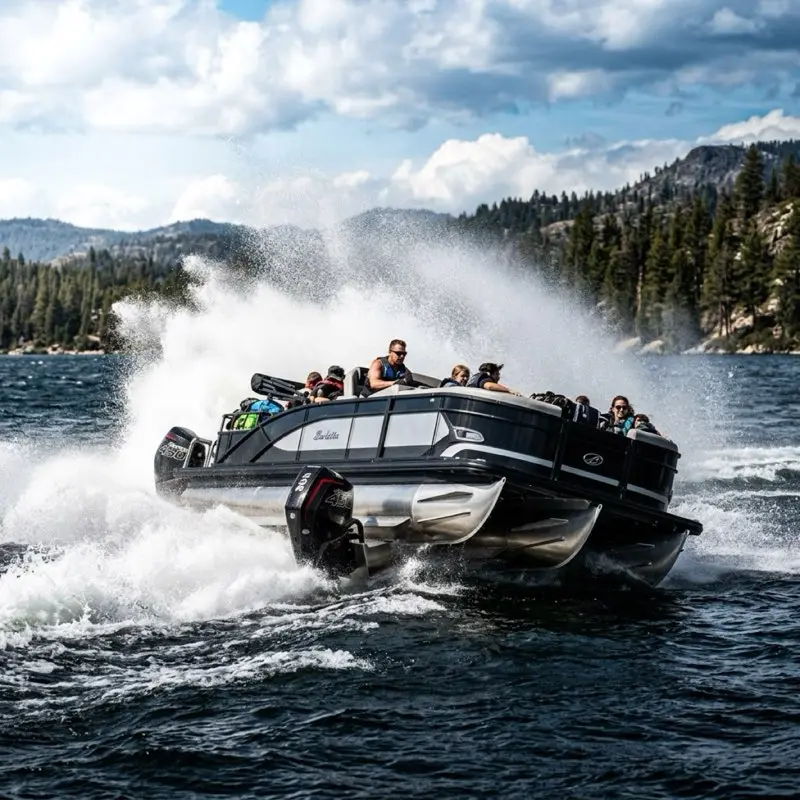
Phase 9: Bimini and Canvas (High-Speed Reinforcement)
Your Bimini top is a giant sail. If it's not reinforced, it will bend or snap at 30 MPH.
9.1 Frame Materials
- Aluminum Frames: Light and affordable, but can "chatter" and vibrate.
- Stainless Steel Frames: Heavy and expensive, but bulletproof. If you have a high-horsepower tritoon, stainless is the only choice.
9.2 Fabric Choice
Sunbrella is the industry standard for a reason. It is a solution-dyed acrylic that will not fade for 10 years. Generic polyester tops will fade and tear within two seasons.
Phase 10: Trolling Motor Integration (Voltage and Thrust Math)
If you are a fisherman, a bow-mounted trolling motor is the #1 upgrade. But you can't just bolt it on.
10.1 Calculating Thrust
A pontoon is a "wind sail." You need more thrust than a comparable fiberglass boat.
- The Rule of Thumb: 2 lbs of thrust for every 100 lbs of fully loaded boat weight. For a 20ft pontoon (~3,500 lbs), you need at least a 70 lb thrust motor. This means a 24V system is mandatory.
10.2 Wiring the 24V/36V Bank
You must use 6 AWG wire for the run from the batteries (usually in the back) to the bow. If you use thinner wire, the voltage drop will cause the motor to lose 20% of its power and the wires to overheat. Install a dedicated 60-amp circuit breaker at the battery.
Phase 11: The "Tritoon Conversion" Technicality
Can you add a third log to an old pontoon? Yes, but it changes the physics of the boat.
11.1 The "X-Dimension" Challenge
Adding a center log increases buoyancy, allowing for a larger motor. However, it also changes the "X-Dimension" (the distance from the bottom of the hull to the propeller). You will likely need to raise your outboard motor by one or two holes on the transom to prevent "plowing" and to achieve the correct RPM at wide-open throttle.
11.2 Lifting Strakes
If you are adding a third log, ensure it has welded lifting strakes. These allow the boat to rise out of the water and plane. Without strakes, a tritoon is just a very heavy displacement boat that will be slower than a twin-log model.
Phase 12: Navigational Electronics and NMEA 2000A plug-and-play communications standard used for connecting marine sensors and display units. Networking
Modern boat electronics work best when they "talk" to each other.
12.1 The NMEA 2000 Backbone
A restoration is the time to install an NMEA 2000 Backbone. This is a single cable that runs the length of the boat with "T-connectors" at every device.
- Engine Data: If your outboard is 2006 or newer, it likely outputs digital data (RPM, Temp, Fuel Flow). By connecting your engine to the NMEA backbone, you can display all your engine gauges right on your GPS screen, eliminating the need for expensive and unreliable analog gauges.
12.2 Transducer Physics
Mounting a transducer on a pontoon is tricky because of the "dirty water" (turbulence) coming off the logs.
- The Pro Move: Mount the transducer on a specialized "transducer bracket" welded to the back of the log. It must sit roughly 1/8" below the bottom of the hull to get a clear reading at high speed. If you mount it too high, you will lose the depth reading at anything over 5 MPH.
Once your boat is restored, it will likely weigh less (if you replaced water-logged wood with new plywood or Coosa). This means your old propeller might not be the right fit anymore.
13.1 Calculating "Slip"
Propeller slip is the difference between the theoretical distance the prop should move in one revolution vs. the actual distance it moves. Pontoons have high slip (usually 20-30%).
- The Test: Run the boat at Wide Open Throttle (WOT). If your engine is hitting the rev limiter, you need to increase the "Pitch" of your prop. If the engine won't reach its recommended RPM range, you need to decrease the pitch.
13.2 Stainless vs. Aluminum
On a restored pontoon, a Stainless Steel Propeller is worth the investment. It has thinner, stiffer blades that won't "flex" under heavy loads, providing better "hole shot" (acceleration) and 2-3 extra MPH on the top end.
Phase 14: Safety Equipment and Regulatory Compliance (2026 Standards)
The USCG has updated their requirements for 2026. Your restored boat must be legal.
14.1 Fire Extinguisher Placement
You must have at least one B-1 Marine Fire Extinguisher mounted in a visible, easily accessible location. On a pontoon, this is usually near the helm. Ensure the gauge is in the "green" and the chemical has been "shaken" to prevent it from packing down at the bottom.
14.2 Life Jacket Accessibility
In 2026, the law requires that life jackets for every passenger be "readily accessible." This means they cannot be in their original plastic packaging and they shouldn't be buried under heavy gear in a locked compartment. Mount them in a dedicated overhead "life jacket bag" under the Bimini top.
Phase 15: Anchoring Systems for Restored Pontoons
Pontoons are notoriously difficult to anchor because of their "windage" (the side panels catch the wind like a sail).
15.1 The Box Anchor Advantage
Forget the traditional fluke anchor. For a pontoon, a Box Anchor is the gold standard. It doesn't require a long "lead chain" and it sets immediately in almost any bottom condition. Because it has such a high "holding power to weight" ratio, a 19-lb box anchor will hold a 24-ft pontoon in 30 MPH winds.
15.2 Electric Anchor Winch Installation
During your restoration, consider installing an electric winch (like a Minn Kota DeckHand). Pontoons are family boats, and no one wants to haul up a muddy 20-lb anchor by hand. Ensure the winch is bolted through the aluminum cross-members with a 1/4" aluminum backing plate to prevent it from ripping through the wood deck.
Phase 16: Storage and Winterization Checklist (The "Protection" Phase)
If you spend $10,000 restoring a boat, don't let the winter destroy it in one season.
16.1 Shrink Wrapping vs. Canvas Covers
- Shrink Wrapping: Best for high-snow environments. It creates a tight, waterproof shell that snow slides right off of. However, it MUST be vented, or you will find a forest of mold in the spring.
- Custom Canvas: A $2,500 investment, but it lasts 10 years and provides "breathability" that shrink wrap doesn't.
16.2 Moisture Absorbers (Star Brite No Damp)
Place at least four No Damp moisture absorber buckets inside the playpen of the boat before winter storage. This prevents the "green fuzzy" mold from growing on your brand-new 32oz vinyl.
Phase 17: DIY vs. Pro Cost Comparison (2026 Reality)
| Task | DIY Cost | Professional Cost | Time Requirement |
|---|
| Decking Replacement | $1,200 | $4,500 | 40 Hours |
| Full Rewire | $600 | $2,500 | 20 Hours |
| Upholstery Install | $2,500 | $6,000 | 15 Hours |
| Log Acid Washing | $100 | $800 | 4 Hours |
| Electronics (NMEA 2K) | $1,500 | $3,500 | 8 Hours |
| TOTAL | $5,900 | $17,300 | 87 Hours |
Don't start without these 18 tools:
- Hydraulic Crimp Tool (for 2 AWG battery cables)
- 4.5" Angle Grinder (with 10 cutoff wheels)
- Low-Pressure Gauge (0-15 PSI for log testing)
- Notched Trowel (1/8" x 1/8" for adhesive)
- 100-lb Flooring Roller (Rent this!)
- Digital Multimeter (for electrical testing)
- Stainless Steel Drill Bits (Cobalt bits are best)
- Heat Gun (for adhesive-lined heat shrink)
- Engine Hoist (for motor pod work)
- Label Maker (for wiring)
- NMEA 2000 Starter Kit
- Aluminum Brightener Spray Bottle
- High-Speed Buffer (for log polishing)
- Torque Wrench (for motor pod bolts)
- Vacuum Pump (for fuel polishing)
- TIG Welder (or a local welding contact)
- C-Clamps (for fencing alignment)
- Pop-Rivet Gun (for aluminum skinning)
Phase 19: Frequently Asked Questions (The 2026 FAQ)
Q: Can I use outdoor house carpet?
A: No. House carpet uses Jute or rubber backing that will trap water and rot your deck in two years. Use only marine-grade vinyl or carpet.
Q: How do I know if my engine is worth saving?
A: Perform a "Compression Test." Every cylinder should be within 10% of each other. If one cylinder is at 80 PSI and the others are at 120 PSI, the engine needs a rebuild.
Q: Should I paint my logs?
A: Only if you are leaving the boat in saltwater. Otherwise, keep them bare aluminum and use an acid wash once a year to keep them bright.
Q: How many sheets of plywood do I need?
A: Most 20-22ft pontoons require 6 to 7 sheets of 4'x8' plywood. Always buy one extra sheet for "mistakes" in cutting the console or motor pod openings.
Phase 20: Conclusion
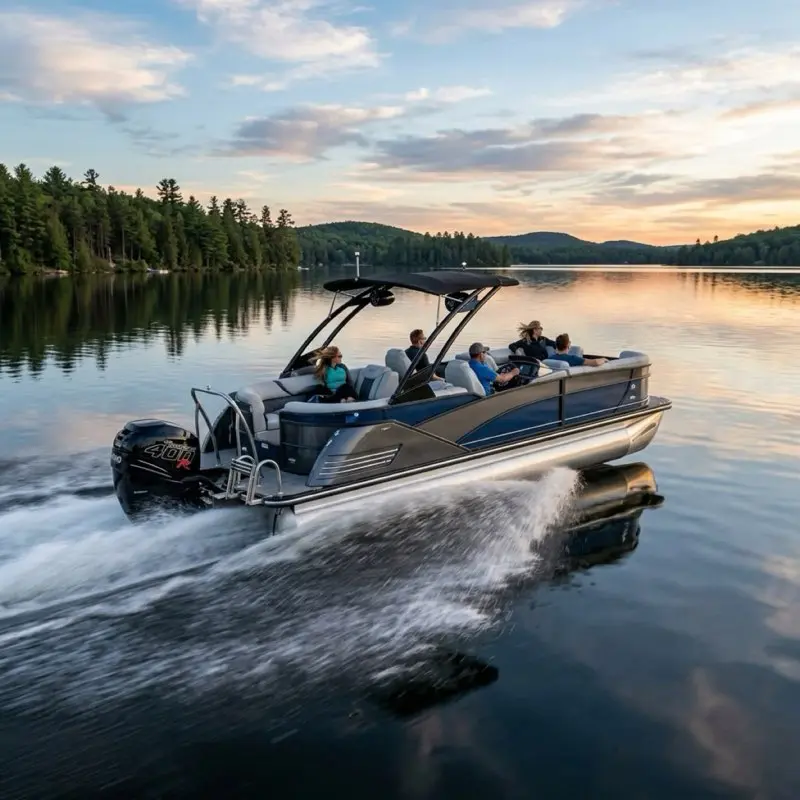
Restoring a pontoon isn't just a weekend project; it's a marathon. But when you slide that boat off the trailer for the first time, with its rock-solid floor, modern woven vinyl, and bulletproof electrical system, you will realize it was worth every hour of labor.
Take your time, don't skimp on the structural audit, and use only marine-grade materials. Your "restored" pontoon will likely outlast many modern boats built with "planned obsolescence" in mind.
Stay safe, measure twice, and I'll see you on the water!