The Vacuum Protocol: Why Your Lower Unit is Sucking Water (And How to Stop It)
AuthorMike Callahan
PublishedFebruary 5, 2026
Read Time12 min
UpdatedFebruary 5, 2026
Quick Brief
TL;DR Protocol
Why does your lower unit oil look like chocolate milk even though your seals 'passed' a pressure test? Discover the thermodynamics of 'Cold Soaking' and the mandatory -10 PSI vacuum test.
UNIT-REF: BG-NAV-742
#lower unit water in oil#outboard gearcase pressure test#milky lower unit oil#vacuum test outboard lower unit#marine gearcase maintenance#boat motor lower unit seals
If you’ve ever pulled the bottom drain plug on your lower unit and watched a stream of "chocolate milk" ooze out instead of clear, amber gear oil, you know that sinking feeling in your gut. It’s the sound of dollar signs hitting the pavement.
You take it to a shop. They drain it, put a pressure tester on it, pump it up to 15 PSI, and tell you: "The seals held, Mike. We can't find a leak."
You put new oil in, go out for one weekend, and, lo and behold, the milk is back. You feel like you're losing your mind. If the seals are holding pressure, how is the water getting in?
Here is the truth that’ll save your gears (and your sanity): Your lower unit isn't leaking water in; it’s sucking it in.
If you’ve been relying on a standard pressure test to find your leak, you’re only looking at half the story. Today, we’re going deep into the thermodynamics of "Cold Soaking" and the mandatory Vacuum Protocol that every pro mechanic uses but few DIYers understand.
Mike Callahan's Masterclass Note: "Water doesn't 'leak' in; it’s 'sucked' in when your hot gearcase hits cold water. A pressure test only checks if oil can get out. A vacuum test checks if water can get in. If your outer seal lips are worn, they’ll hold 20 PSI of internal pressure all day long, but they’ll fail a -10 PSI vacuum test in seconds. That is where the 'milk' comes from."
Diagnostic Metric
Specification / Goal
Pressure Test Limit
15 - 18 PSI (Held for 30 mins)
Vacuum Test Limit
-10 to -15 InHg (Held for 30 mins)
The "Cold Soak" Drop
Up to -5 PSI internal vacuum
Mandatory Tool
Mityvac MV8500 or Gearcase Specific Pump
Critical Failure Point
Prop Shaft Seals (Outer Lip)
The Physics of the "Cold Soak": Charles’s Law in the Marina
To understand why your lower unit is acting like a vacuum, we have to talk about a bit of high school physics: Charles’s Law.
Basically, the volume of a gas is directly proportional to its temperature. When you run your boat at 4,000 RPM for an hour, the gears in your lower unit are spinning at thousands of revolutions per minute. This creates friction, which creates heat. It isn't uncommon for the air and oil inside that gearcase to reach 140°F or higher.
When that air gets hot, it expands. It builds internal pressure. If your seals are healthy, they hold that pressure.
The Thermal Shock
Now, imagine you pull back the throttle and shut off the engine near your favorite sandbar. You aren't moving anymore. The 140°F gearcase is suddenly sitting in 70°F water.
The temperature inside the case drops rapidly. As the temperature drops, the air inside contracts. This contraction creates a partial vacuum.
This is the moment of truth.
If your seals are slightly worn, they are now trying to pull "something" in to fill that vacuum. Since your gearcase is underwater, that "something" is lake water or saltwater. This is the Cold Soak Effect. It doesn't happen when the boat is sitting on the trailer; it happens in those first 20 minutes after you shut down in the water.
The Testing Gap: Why Pressure Tests Lie
Most DIY "leak kits" only come with a pressure pump. You pump air into the case through the drain hole and wait to see if the needle drops.
Here is why that test is deceptive:
Marine seals are usually "double-lip" or two seals placed back-to-back.
The Inner Lip: Designed to keep oil in.
The Outer Lip: Designed to keep water out.
When you perform a pressure test, you are pushing air from the inside out. You are pressing the inner lip tighter against the shaft. It might seal perfectly under pressure.
But a vacuum test does the opposite. It pulls air from the outside in. This pulls the outer lip away from the shaft. If that outer lip is worn, nicked by fishing line, or has lost its tension spring, it will fail a vacuum test immediately, even if it held 20 PSI of pressure just a minute ago.
THE FISHING LINE HAZARD
90% of prop shaft seal failures are caused by monofilament fishing line wrapped behind the prop. It melts into the rubber lips and creates a "micro-groove" that only fails under vacuum. If you see line, don't just pull it off, the seal is likely already compromised.
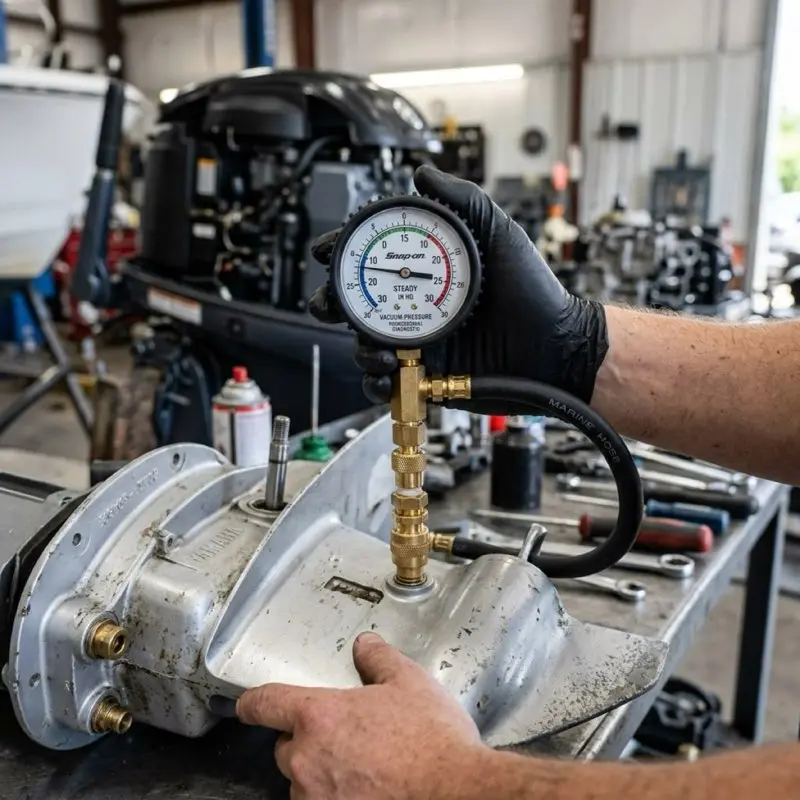
The Masterclass DIY Vacuum Rig
You don't need a $10,000 diagnostic machine to do this. You need about $80 worth of tools and 30 minutes of time.
The Gear List
A Vacuum Pump: The Mityvac MV8500 is the gold standard for this. It can do both pressure and vacuum.
The Adapter: You need the specific threaded adapter for your engine (Mercury, Yamaha, and Evinrude all use different threads).
New Washers: Never, ever reuse the fiber washers on your drain/fill plugs. They are one-time-use items.
The Step-by-Step Protocol
Drain the Oil: You cannot perform a vacuum test with oil in the case. The oil will get sucked into your pump and ruin it. Drain the oil and let it sit for 10 minutes to drip dry.
Connect the Pump: Screw the adapter into the top (vent) hole. This is the easiest place to get a good seal.
The Pressure Phase: Pump it up to 15 PSI first. If it doesn't hold pressure, your vacuum test is pointless, you’ve got a major leak.
The Vacuum Phase: Bleed the pressure and switch your pump to "Vacuum." Pump it down to -10 to -12 InHg (Inches of Mercury).
The Wait: Set a timer for 30 minutes. If the needle moves more than 0.5 InHg, you have a failing seal.
The "Death Trap" Symptoms: How to Catch it Early
You shouldn't wait until your oil is white to worry about this. Here are the "Mike Callahan" field signs that your Vacuum Protocol is failing:
* The "Oil Slick" on the Skeg: You see a faint film of oil running down the skeg after the boat has been sitting. This means pressure pushed oil out while it was hot.
* The Hissing Vent Plug: When you go to check your oil, you hear a "whoosh" of air when you loosen the top plug. This means the gearcase held its vacuum, which is actually a *good* sign, but it means your vent washer might be the only thing holding the line.
* The "Gritty" Oil: Even if the oil isn't milky, if it feels "gritty" between your fingers, you've had water intrusion that has already started to rust the gear teeth.
The Fix: Seal Orientation Lore
If you find a leak, don't just slap new seals in. You have to understand the Back-to-Back principle.
On most professional-grade lower units, the two seals on the prop shaft are oriented in opposite directions.
The Inner Seal has the spring facing the inside (to hold oil).
The Outer Seal has the spring facing the outside (to hold water).
If you accidentally install both seals facing the same way, you will pass a pressure test but fail a vacuum test (or vice versa). I’ve seen factory-authorized shops make this mistake. Always check the service manual for your specific model’s seal orientation.
FAQ: Can’t I just change the oil every 20 hours?
I hear this a lot from guys trying to "nurse" a leaking lower unit through a season.
"Mike, if I just change the oil every two weeks, I'm flushing the water out, right?"
Wrong. Water doesn't just sit there. It emulsifies. It becomes a corrosive sludge that eats the case hardening off your gears. Once the "chrome" finish on your gears is gone, the friction increases, the heat increases, and you are on a fast track to a "Gear Grenade", where the internals explode and lock your engine up while you're at full throttle.
A $50 seal kit is a lot cheaper than a $4,000 remanufactured lower unit.
The Anatomy of a Fail: The Garter Spring Secret
If you've ever held a marine seal in your hand, you've noticed a tiny, circular spring hidden behind the rubber lip. In the industry, we call this a Garter Spring.
This spring is the "heart" of the seal. Its job is to provide constant, even pressure around the circumference of the shaft. However, in a lower unit, this spring is under constant attack.
The Corrosion Paradox
Most people assume that because the spring is inside the seal, it’s protected from the water. But remember the "Vacuum Protocol"? When your engine cools down and sucks a tiny bit of water past the outer lip, that water gets trapped right against the garter spring.
If that spring is made of carbon steel (common in cheap aftermarket seals), it will rust and snap in weeks. Once that spring snaps, the seal loses its "memory." It’ll still look perfectly fine to the naked eye, but it no longer has the tension required to hold a vacuum.
Mike’s Tip: Always insist on 316 Stainless Steel garter springs. If the seal box doesn't explicitly say "Stainless," don't put it in your boat.
The "Prop Shaft Groove" Crisis: When New Seals Aren't Enough
Sometimes, you do everything right. You buy the expensive seals, you orient them back-to-back, you use the right tools, and the gearcase still fails the vacuum test.
What’ll do that? A groove in the prop shaft itself.
Over thousands of hours, the friction of the rubber seal (and the grit it traps) actually wears a microscopic valley into the stainless steel shaft. When you install a new seal, the lip sits right in that old valley. Because the valley isn't perfectly smooth anymore, it won't hold a vacuum.
The Speedi-Sleeve Masterclass
In the old days, a grooved shaft meant a $800 prop shaft replacement. Today, we have a "Masterclass" fix: the Speedi-Sleeve.
A Speedi-Sleeve is a micro-thin, stainless steel sleeve that you press-fit over the grooved area of the shaft. It provides a brand-new, factory-smooth surface for your new seals to ride on.
The Benefit: It restores the vacuum seal without needing to disassemble the entire gear carrier.
The Warning: You only get one shot to press it on straight. If you cock it even half a degree, you’ll tear your new seals the moment you start the engine.
Gearcase Autopsy: The Stages of Death
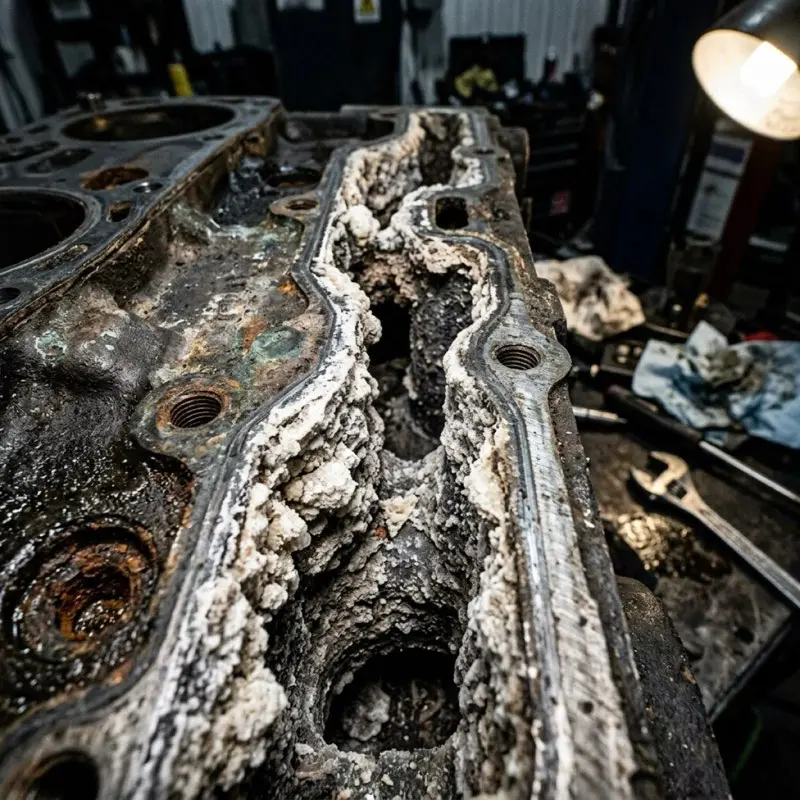
I want you to understand exactly what is happening to your gears while you're "nursing" that milky oil. Water doesn't just dilute the oil; it changes the chemistry of the entire environment.
Stage 1: The Emulsion (0-10 Hours)
The oil turns into a "mayonnaise" consistency. At this stage, the lubrication is still somewhat functional, but the Load-Bearing Capacity of the oil is cut by 50%. You’ll start to see a "grey haze" on the gear teeth. This is the chrome finish being polished away by friction.
Stage 2: The Pitting (10-50 Hours)
Once the water has been in the case for a few weeks, it starts to create microscopic "pits" on the bearing races and gear faces. This is Hydrogen Embrittlement. The water releases hydrogen molecules that actually penetrate the metal and make it brittle.
Stage 3: The "Gear Grenade" (50+ Hours)
This is the end of the line. The pitting has become so severe that a chunk of a gear tooth finally snaps off under load. That chunk gets caught in the mesh of the other gears. Since the gears have nowhere to go, they "climb" over each other, shattering the cast-aluminum gearcase from the inside out.
If you're lucky, the engine just stalls. If you're unlucky, the lower unit explodes and the sudden drag pulls your boat into a "J-hook" turn at 40 MPH.
Advanced Troubleshooting: The Soapy Water Trick
If you're struggling to find exactly where the vacuum leak is, you can use a "Pressure-Reverse" diagnostic.
Pump to 15 PSI: Get the case under pressure.
The Bubble Test: Spray a mixture of dish soap and water around the prop shaft, the shift shaft, and the water pump base.
Watch the Bubbles: If you see "growing" bubbles, you’ve found your leak.
But here is the catch: Sometimes a seal will leak under vacuum but not under pressure. If you can't find any bubbles but you're still losing vacuum, you have a One-Way Failure on the outer lip. At that point, stop guessing and replace the entire seal kit.
FAQ: Can I use "Stop-Leak" additives in my lower unit?
I see this question on the forums a lot. Some guy says he put a bottle of "Transmission Stop Leak" in his gearcase and it "fixed" his milky oil.
Don't do it.
Transmission stop-leak works by causing the rubber seals to swell up. While this might temporarily stop a leak, it also makes the rubber much softer and more prone to tearing. More importantly, those additives can react with high-pressure gear oil (GL-5) and create a "sludge" that blocks the oil passages to your upper bearings.
You’re trying to fix a $50 problem with a $5 solution that will cause a $4,000 disaster.
Summary: Respect the Vacuum
The ocean is trying to get into your boat every second you are on the water. Your lower unit is the front line of that battle.
If you take away one thing from the Vacuum Protocol, let it be this: A pressure test tells you the oil is safe. A vacuum test tells you the gears are safe.
Buy the pump, check the seals, and never ignore the "milk."
Stay dry, stay smooth, and I’ll see you at the ramp.