Outboard Running Rough? The Callahan 5-Step Diagnostic
AuthorMike Callahan
PublishedFebruary 27, 2026
Read Time12 min
UpdatedApril 24, 2026
Quick Brief
TL;DR Protocol
Is your outboard sputtering, hesitating, or shaking violently when you push the throttle? Before you buy a single part, use this 5-step diagnostic sequence to determine whether you have a spark problem, a fuel problem, or something else entirely.
You push the throttle forward to get up on plane. Instead of a smooth surge of power, the engine shakes violently, sputtering, hesitating, sounding like it's gargling underwater. You pull back to neutral and it idles fine. Push forward again: same thing. Your family is watching from the dock.
A rough-running outboard will ruin your weekend. Throwing parts at it will ruin your wallet.
A rough-running outboard motor is caused by one of two things: fuel starvation (clogged carburetor jet, failing fuel pump, or dirty injector) or spark failure (fouled plug, weak coil, or failed ignition component). The correct diagnostic sequence identifies which system is to blame in under 20 minutes, before you spend money on the wrong repair.
Here's the good news: you can run this entire diagnostic at the dock or in your driveway on the garden hose. You don't need a scanner, a scope, or a dealership appointment. You need a spark plug socket, a pair of insulated pliers, and this sequence.
Mike Callahan's Masterclass Note: "I watched a boater spend over $650 replacing an ignition coil, a stator, and a power pack on his 115 HP Johnson, because it was 'missing' at high speed. The real problem was a tiny speck of ethanol varnish clogging the high-speed jet in his bottom carburetor. Before you buy a single part, make the engine tell you what's wrong."
Symptom
Most Likely Cause
First Test
Fine at idle, rough under load only
Clogged high-speed carb jet or weak fuel pump
The Choke Test (Step 1)
One cylinder dead, violent shake
No spark or no fuel on that cylinder
Cylinder Drop Test (Step 3)
Rough at all RPMs, all cylinders
Bad fuel, clogged filter, or failing coil on multiple cylinders
Spark plug pull (Step 2)
"Lean sneeze", puff through intake
Air-fuel mixture too lean, clogged jet
Choke Test + carb rebuild
Hard start, then smooths out
Stuck choke or stuck float needle
Plug color check
Runs fine in neutral, dies in gear
Timing advance issue or severe low-speed jet clog
Step 2 + Step 4
The One Rule That Saves You Money
Engines behave differently at idle versus under load, and understanding why cuts your diagnostic time in half.
Idling in neutral: The engine draws fuel through tiny idle circuits in the carburetor and fires at low spark voltage. Any basic function can keep it running here.
Getting on plane (under load): The engine opens its high-speed jets and demands maximum spark voltage to ignite a dense air/fuel mixture. Every weak link in the system reveals itself.
If your engine idles perfectly but falls apart when you push the throttle, your idle circuits and basic timing are fine. You are hunting for one specific thing: a fuel restriction or a weak spark that only appears under load. This narrows your search enormously before you touch anything.
Step 1: The Choke Test, Isolating Fuel Starvation in 60 Seconds
This is the fastest test available. Do it on the water at the exact moment the rough running appears.
Get the boat into open water
Accelerate to the RPM where the engine begins sputtering
While actively sputtering: momentarily push the key in to activate the choke (or the electric primer), for just 1–2 seconds
Result A, Engine temporarily smooths out and surges:
You have a fuel problem. Activating the choke dumped extra fuel into the cylinders and compensated for a restriction. Your high-speed carburetor jets are clogged, your fuel pump is weak, or your water-separating filter is blocked.
Result B, Engine bogs down worse or dies:
You likely have a spark/ignition problem. The engine already had enough fuel, by choking it, you flooded it, drowning what was already a weak spark. Move to Step 2.
This single test divides every rough-running diagnosis into two branches. Everything downstream follows from this answer.
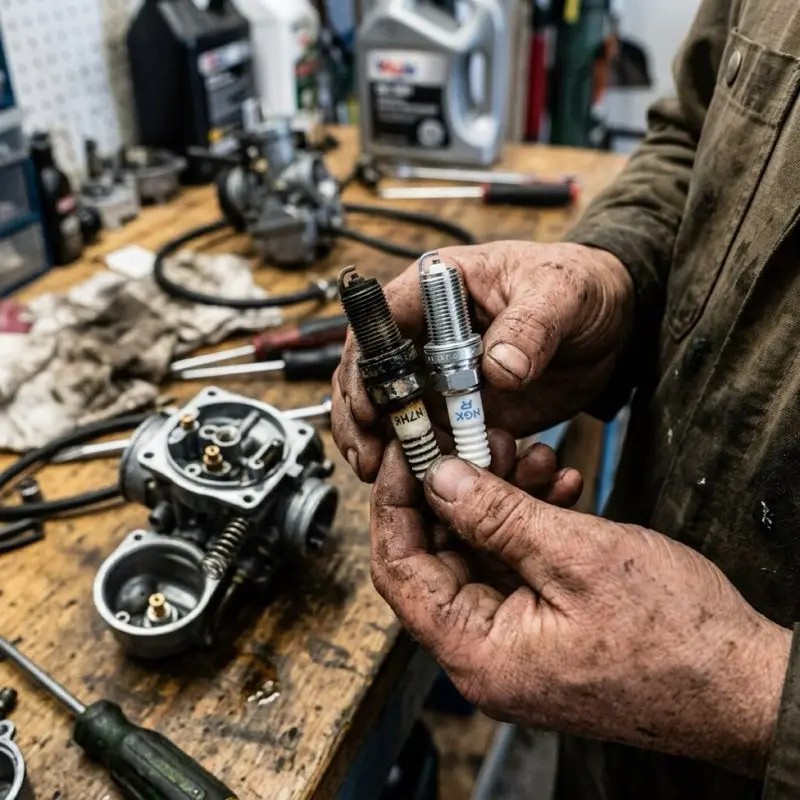
Step 2: Reading the Spark Plugs, The Windows Into Your Cylinders
Spark plugs tell you exactly what's happening inside each combustion chamber. Pull them all, keep them in cylinder order, and read them like a report card.
What you're looking for:
Cardboard tan / light brown, The Perfect Plug
The ceramic insulator is dry and light tan. That cylinder is burning correctly. If every plug looks like this but the engine still runs rough, your problem is system-wide fuel restriction, check the primary fuel filter and test the fuel pump.
Wet, black, and shiny, Fuel/Oil Fouled
That cylinder is not firing. Fuel and oil are entering but the plug isn't igniting them.
Fix: Replace with a new plug. If the new plug also comes out wet and black after a test run, the ignition coil or plug wire for that cylinder has failed, move to Step 3 to confirm.
Dry, sooty, flat black, Carbon Fouled
The cylinder is running rich (too much fuel, not enough air). The carburetor float needle may be stuck open, or the choke is stuck closed.
Fix: Inspect the float needle and choke mechanism. Carburetor rebuild likely needed.
Bone white and blistered, Running Lean
This is the most dangerous condition on this list. A chalky, white plug means the cylinder is starved for fuel and running extremely hot.
Fix: The carburetor feeding that cylinder has a clogged jet. Do not run the engine under load until the carburetor is rebuilt. A lean cylinder melts pistons. This isn't a "fix it next weekend" situation.
WHITE PLUG = IMMEDIATE STOP.
A bone-white, blistered plug means that cylinder is running dangerously lean. Running the engine under load in this condition will melt the piston crown. Shut down, do not operate under load, rebuild the carburetor for that cylinder before your next outing.
Pro tip: Marine-grade NGK or Champion plugs are what your manual specifies for a reason. Gap each new plug before installation, check the spec in your owner's manual, typically 0.030"–0.040" for most outboards.
Step 3: The Cylinder Drop Test, Finding the Dead Cylinder
If the engine shakes violently, one or more cylinders are "dead", not firing. An engine running on 3 of 4 cylinders vibrates hard enough to shake fittings loose over time.
The drop test isolates the dead cylinder by removing its contribution and listening for what changes.
You need: Insulated spark plug boot pliers (the long-handled type with rubber-coated jaws, these are non-negotiable, you are working near high-voltage ignition leads)
The test:
Start the engine at idle (you can do this on garden hose muffs at home)
Using the insulated pliers, carefully pull the spark plug boot off the top cylinder
If RPM drops and running worsens: That cylinder was contributing power, it's working. Reattach the boot.
Move to the next cylinder and repeat
If pulling a boot causes NO change in engine sound or RPM: You've found the dead cylinder. Pulling its wire made zero difference because it wasn't firing in the first place.
Now find the cause:
Swap the ignition coil from the dead cylinder with the coil from a confirmed good cylinder. Run the drop test again:
If the "dead" behavior moves to the new cylinder location → the ignition coil is bad
If the same cylinder stays dead regardless of which coil it has → the carburetor feeding that cylinder is clogged, or that cylinder has low compression
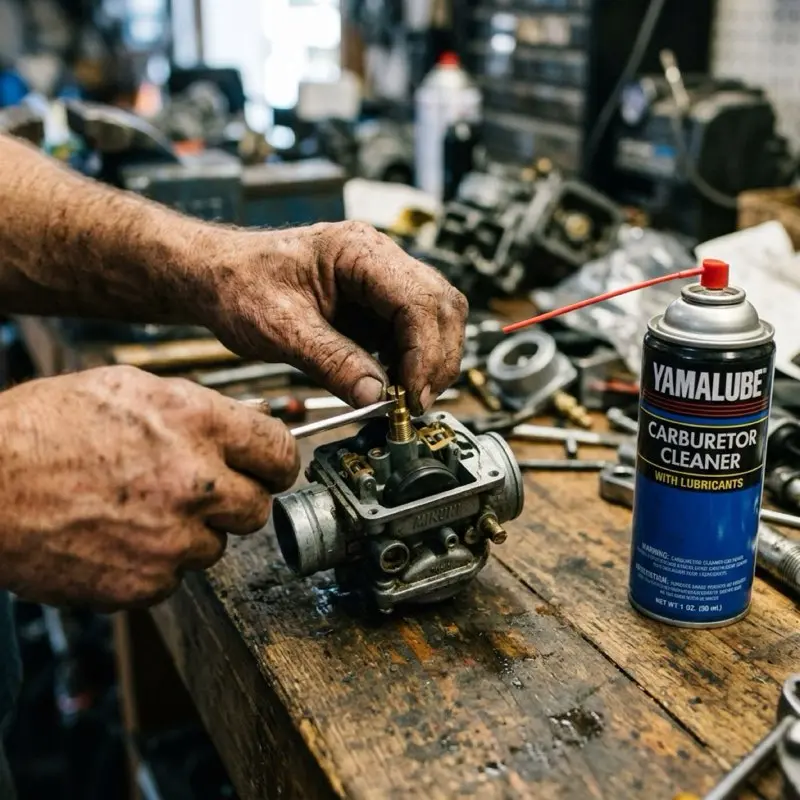
Step 4: The Carburetor Reality, What Ethanol Actually Does
If your plugs look healthy and you have strong blue spark on all cylinders, the rough running is in the carburetors. This is the most common finding on boats that sat more than 30 days without fuel stabilizer.
Modern E10 gasoline (10% ethanol) separates when stored and leaves behind a varnish, a sticky, greenish-white residue that clogs the microscopic brass orifices inside the carburetor jets. These jets are often 0.028"–0.045" diameter. A single speck of varnish blocks them completely.
Do "mechanic in a bottle" additives work?
SeaFoam, Berryman B-12, and similar products are excellent for preventing buildup when used regularly. They will almost never unclog a jet that's already fully blocked with hardened varnish. Once the varnish has set, the carburetor must be physically disassembled and the jets cleaned mechanically or soaked in carburetor cleaner overnight.
The rebuild rule: If one carburetor is clogged, rebuild all of them. V4 engines have two or four carbs; V6 engines have three or six. If one has varnish, the others are close behind, and you don't want to do this job twice.
Buy an OEM carburetor rebuild kit for your specific motor. Aftermarket kits exist and can work, but OEM gaskets and needle valves are machined to tighter tolerances. On a motor you're putting back in service after sitting, don't cut corners on the kit.
Step 5: The "Lean Sneeze", When the Air Intake Is the Problem
If your engine idles rough and makes a sudden puffing or popping sound through the air intake (not through the exhaust), you're hearing a lean sneeze, a small backfire through the intake caused by insufficient fuel in the cylinders.
The cause: The air/fuel mixture is too lean, too much air, not enough fuel. Most common causes:
A microscopic piece of debris clogging a low-speed carburetor jet
A stuck-open needle valve allowing too much air
Cracked or perished primer bulb allowing air to leak into the fuel line
The fix: Start with the primer bulb, squeeze it firmly. If it doesn't stay firm, the bulb has a crack and is bleeding air into the fuel circuit. Replace it ($8–$15) before rebuilding carburetors. A leaking primer bulb mimics every symptom of a clogged jet and is far simpler to fix.
If the bulb is solid, a heavy dose of SeaFoam through the carburetor throat (engine running at idle) can sometimes dissolve a marginal clog in the low-speed circuit. If it doesn't improve within 10 minutes of running, the carburetor needs to come off.
The Full Diagnostic in Order
Step
Test
Time
What It Confirms
1
Choke Test (on water)
2 min
Fuel vs. spark problem
2
Read spark plugs
10 min
Which cylinder is affected; lean/rich/no-fire
3
Cylinder drop test
10 min
Which cylinder is dead; coil vs. carb
4
Carburetor inspection
20+ min
Varnish, clogged jets, float height
5
Lean sneeze / primer bulb
5 min
Air leak in fuel circuit
Run these in order. Do not skip to Step 4 without running Step 1, you'll spend an hour rebuilding carburetors on a boat that has a bad ignition coil.
Frequently Asked Questions
My outboard runs fine at idle but sputters the moment I go above 2,500 RPM. What is it?
Classic high-speed jet restriction. At idle, the engine draws fuel through small-diameter idle circuits. Above 2,500 RPM it opens the main high-speed jets, and if those are blocked with ethanol varnish, the engine starves instantly. Run the Choke Test to confirm, then rebuild the carburetors.
I replaced the spark plugs and it still runs rough. What next?
New plugs eliminate the plug as the cause, but they don't fix an ignition coil, a fuel restriction, or a compression issue. Go to Step 1 (Choke Test) to determine if it's fuel or spark, then Step 3 (Cylinder Drop Test) to isolate the specific cylinder. Replacing plugs is the start of the diagnostic, not the end.
Can phase-separated fuel cause rough running?
Yes, and it's more common than most boaters realize. Phase-separated E10 fuel (ethanol that has bonded with water and settled to the bottom of the tank) runs extremely lean and can melt pistons. If your boat sat all winter and you're getting rough running right at the start of the season, drain and replace the fuel before any other diagnostic step. Check our ethanol phase separation guide for the full chemistry and diagnosis.
How do I know if I have low compression, not a carb or spark problem?
Low compression produces a specific pattern: the cylinder drop test shows a "dead" cylinder, but swapping the ignition coil doesn't move the problem (eliminating the coil), and the spark plug for that cylinder comes out perfectly tan (eliminating the fuel circuit). A compression gauge on that cylinder will confirm, a reading significantly below spec (more than 15% lower than other cylinders) points to internal mechanical wear. This repair requires a mechanic.
What's the correct spark plug gap for outboard motors?
It varies by engine, but most modern 4-stroke outboards specify 0.028"–0.040". Most 2-strokes run tighter, at 0.020"–0.030". Always check your owner's manual for the exact spec and use a feeler gauge to verify before installation, the factory gap on new plugs is often incorrect for your application.
This diagnostic guide applies to gasoline outboard motors (carbureted and EFI). Diesel outboard diagnostic procedures differ significantly. For EFI/DFI engines, ignition system and fuel delivery diagnosis may require a manufacturer-specific diagnostic scan tool to retrieve fault codes before hands-on testing.