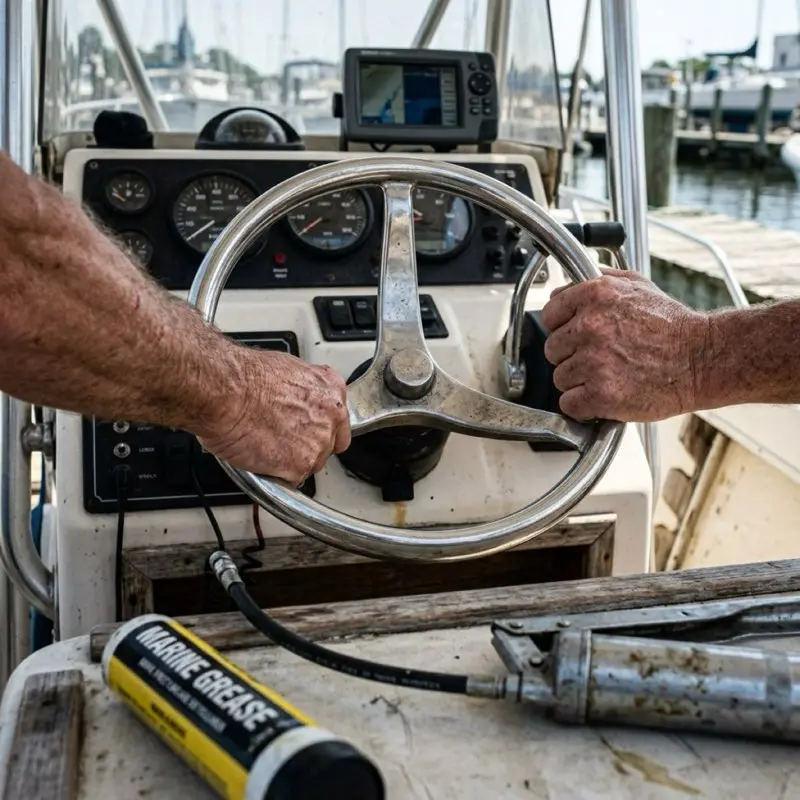
There is a moment when you realize your boat's steering has gone from "a little heavy" to genuinely unsafe. For me, it was docking a 24-foot pontoon in a crosswind. I spun the wheel hard to starboard to kick the stern in, and the wheel felt like it was set in concrete. I had to stand up and use both hands to muscle it over, completely blowing the approach.
Stiff steering is not just an annoyance; it is a critical safety failure. It increases driver fatigue, ruins your low-speed maneuverability, and in an emergency avoidance situation, that two-second delay while you fight the wheel can be catastrophic.
Whether you have a mechanical cable system (common on boats under 22 feet) or a hydraulic system (standard on larger or higher-horsepower boats), steering systems do not get stiff overnight. It is a progressive failure caused by friction, corrosion, or fluid loss.
Here is exactly how to diagnose which system you have, where the friction is coming from, and how to fix it before you end up standing at the helm wrestling with the wheel.
About this guide: Mike Callahan has twenty-two years of experience running center consoles, pontoons, and aluminum skiffs. During his time as a service advisor at a marine dealership, stiff steering was a weekly complaint, particularly in the spring after boats had sat unused all winter. The lubrication and bleeding techniques in this guide are the standard practices used by certified marine riggers to restore smooth helm operation.
First: Identify Your Steering System
The diagnosis paths for cable and hydraulic steering are completely different. Look behind your steering wheel (the helm) or at the engine bracket.
Mechanical Cable Steering: You will see a thick, black, stiff cable (about the diameter of a garden hose) running from the back of the steering wheel, along the gunwale, and terminating in a stainless steel rod that slides through the tilt tube of your outboard motor. (Brands: Teleflex, SeaStar Solutions, Uflex).
Hydraulic Steering: You will see two flexible, high-pressure hydraulic hoses running from the back of the steering wheel to a hydraulic cylinder mounted on the front of your outboard motor. (Brands: SeaStar, BayStar, Uflex).
Part 1: Fixing Stiff Mechanical Cable Steering
Cable steering systems rely on a stainless steel inner core sliding back and forth inside a lubricated outer jacket. When the steering gets stiff, 90% of the time the issue is located at the very back of the boat, where the cable exits the jacket and enters the motor's tilt tube.
Water intrudes here, washing away the grease and causing the old grease and salt to turn into a hard, cement-like paste.
Diagnostic: Is it the Cable or the Motor?
Before you start pumping grease, you must determine if the friction is in the steering cable or the motor's swivel bracket.
- Disconnect the cable from the motor: Locate the steering arm (the metal linkage connecting the end of the steering cable to the front of the outboard). Remove the bolt disconnecting the cable from the arm.
- Turn the steering wheel: With the motor disconnected, turn the wheel. If the wheel is still stiff and hard to turn, the friction is in the cable or helm. If the wheel spins freely with one finger, the friction is in the motor's swivel bracket.
- Move the motor by hand: Grab the back of the outboard cowling and try to swing the motor side to side. It should move relatively easily. If it requires massive effort to swing the motor, the swivel bracket is seized.
Fix 1: Lubricating a Stuck Tilt Tube
If the cable is stiff (and you have confirmed it is not the motor pivot), the grease in the tilt tube has likely hardened.
What NOT to do: Do not spray WD-40 on the exposed steering rod. WD-40 is a solvent, not a lubricant. It will temporarily free up the rod, but it will also dissolve the remaining marine grease inside the tube, guaranteeing the cable will seize permanently within a month.
The Proper Fix:
- Clean the exposed rod: Extend the steering rod fully (usually by turning the wheel hard to port). Clean the old, crusty grease off the exposed stainless steel rod using a rag and a mild solvent like mineral spirits.
- Lubricate the tube: There is a grease zerk fitting on the outboard's tilt tube (the tube the steering cable passes through). Using a marine grease gun, pump Quicksilver 2-4-C Marine Grease or a high-quality Teflon/PTFE marine grease into the fitting while someone slowly turns the steering wheel back and forth.
- Purge the old grease: Keep pumping until you see fresh, clean grease pushing out the ends of the tilt tube, displacing the old, hardened brown/black grease.
- Install a Cable Buddy (Highly Recommended): If your steering is chronically stiff, the best $35 you can spend is on a Steersman Steering Cable Guard (often called a Cable Buddy). It is a stainless steel nut with a zerk fitting and an internal O-ring that seals the end of the tilt tube. It forces grease down the cable rather than just letting it squeeze out the sides, and prevents water from entering.
Fix 2: Replacing a Failed Steering Cable
If you have thoroughly greased the tilt tube, the motor pivots freely, and the steering is still stiff, the internal core of the steering cable has rusted or the inner Teflon liner has worn through.
There is no way to lubricate the inside of a sealed steering cable. If it is internally seized, it must be replaced.
How to replace it:
- Find the part number: Look at the plastic jacket of your existing cable. Printed on it (usually near the helm end) will be a part number and a length in feet (e.g., SSC6214 means a 14-foot cable).
- Order the exact length: Do not guess. A cable that is one foot too long will bind; one foot too short won't reach. A new SeaStar Teleflex replacement cable typically costs $120–$180.
- The "Pull" Method: Disconnect the old cable at the helm and the motor. Tape the engine-end of the new cable securely to the helm-end of the old cable. As you pull the old cable out from the back of the boat, it will route the new cable through the exact same path under the deck.
Part 2: Fixing Stiff Hydraulic Steering
Hydraulic steering (like SeaStar or BayStar) uses fluid pressure instead of a physical cable. It should feel incredibly smooth. If a hydraulic system is stiff, spongy, or "notchy," it is almost always a fluid issue.
Diagnostic: Spongy vs. Stiff
- Spongy/Bouncy: If you turn the wheel and it feels like it "bounces" back slightly, or if you can push the outboard motor side-to-side by hand and watch the steering wheel turn on its own, there is air in the system.
- Heavy/Stiff: If the wheel is uniformly hard to turn in both directions but doesn't feel bouncy, you either have low fluid, the wrong fluid, or the pivot points on the motor/cylinder are seized.
Fix 1: Check and Top Off the Fluid
The helm pump (behind the steering wheel) acts as the fluid reservoir.
- Locate the fill cap on the top of the helm pump.
- Remove the cap and check the fluid level. It should be within 1/4 inch of the bottom of the filler hole.
- If it is low, top it off. Crucial: Only use manufacturer-specified fluid, such as SeaStar Hydraulic Steering Fluid (HA5430H). Never use automotive power steering fluid, ATF, or generic hydraulic oil. Marine systems require specific anti-foaming agents and viscosity; the wrong fluid will destroy the seals in the helm pump and cylinder.
Fix 2: Bleed the System
If the fluid was low, air has likely been sucked into the lines. Air compresses; hydraulic fluid does not. Compressed air in the lines causes spongy, unpredictable steering and forces the helm pump to work harder, making it feel stiff.
Bleeding a hydraulic steering system requires two people (or one person with a power bleeder system).
The Basic Bleeding Process:
- Attach a clear plastic hose to the two bleeder valves on the steering cylinder at the engine. Route the hoses into a clean catch bottle.
- Open the helm fill port and attach a bottle of SeaStar fluid using a filler tube kit (to ensure the helm never runs dry during bleeding).
- Open the starboard bleeder valve.
- Have a helper turn the steering wheel smoothly and continuously to starboard. You will see bubbles and fluid push out the bleeder valve.
- Close the valve when the fluid runs completely clear of bubbles.
- Repeat the process for the port side bleeder valve, turning the wheel to port.
(Note: Always consult your specific SeaStar/BayStar manual for the exact bleeding sequence, as multi-engine or autopilot-equipped setups require different patterns).
Fix 3: Lubricate the Support Rod
On hydraulic systems, the steering cylinder slides side-to-side on a stainless steel support rod that runs through the motor's tilt tube. If this rod lacks lubrication, the friction makes the steering feel incredibly heavy.
Wipe the exposed sections of the support rod clean with a rag. Apply a thin, even coat of high-quality marine grease (like Quicksilver 2-4-C) to the rod. Do this monthly.
Part 3: The Motor Swivel Bracket (Both Systems)
If you disconnected your cable or hydraulic cylinder and found that the outboard motor itself is incredibly hard to pivot side-to-side by hand, your problem is not the steering system. The motor's swivel bracket (the vertical hinge the motor turns on) is seized.
This happens when the grease zerks on the motor bracket are ignored for years.
The Fix:
- Locate the grease zerk fittings on the vertical swivel bracket of the outboard (usually there are two: upper and lower).
- Pump fresh marine grease into the fittings while having a helper swing the motor side to side to distribute it.
- If the grease won't go in, the zerk fitting may be clogged. Unscrew the zerk fitting with a small wrench, clean it out, or replace it for $2, and try again.
- If the bracket is severely seized from salt corrosion, you may need to apply gentle heat to the bracket with a heat gun while pumping grease to soften the hardened blockages.
The Prevention Checklist
Steering systems are the most neglected maintenance item on recreational boats. Add these three steps to your annual spring commissioning:
- Grease the tilt tube/support rod: Apply fresh marine grease.
- Check hydraulic fluid level: Top off with correct SeaStar fluid.
- Turn the wheel lock-to-lock: When the boat is on the trailer, turn the wheel fully to port and fully to starboard once a month during the off-season. This keeps the grease spread evenly and prevents the cylinder seals from sticking.
4. The Physics of "Torque Steer": The Sacrificial Tab
If your boat steering is perfectly fine at low speeds but becomes incredibly stiff and pulls to one side when you are at full throttle, you aren't dealing with a mechanical failure. You are dealing with Propeller Torque.
4.1 The Propeller's "Paddle" Effect
A propeller spinning clockwise (standard rotation) naturally tries to push the back of the motor to the right. This causes the boat to pull hard to the right (starboard).
4.2 The Trim Tab Anode Fix
Look at the small zinc fin located just above your propeller on the underside of the anti-ventilation plate. This is the Trim Tab Anode.
- The Adjustment: If your boat pulls to the right, you must move the back of that tab to the right. This creates a small amount of counter-force that offsets the prop torque.
- The Result: A properly adjusted trim tab allows for "Neutral Steering," where you can take your hand off the wheel at cruising speed and the boat continues straight. If this tab is missing or corroded, your steering will feel "stiff" in one direction and "light" in the other.
5. Helm Pump Engineering: The "Heart" of Hydraulic Steering
A hydraulic helm is not just a fluid reservoir; it is a precision Axial Piston Pump.
5.1 The Piston Array
Inside the helm unit, there are usually 5 to 7 small pistons arranged in a circle. When you turn the wheel, you are physically driving these pistons to move fluid.
- The Check Valves: There are internal check valves that lock the fluid in place when you stop turning. This prevents the "kickback" from the engine from spinning the wheel out of your hands.
- The Failure: If your steering is "Notchy" or makes a clicking sound, one of these internal check valves is likely stuck with a piece of debris or metal shaving. This requires a professional rebuild of the helm unit.
6. No-Feedback (NFB) Steering vs. Standard Mechanical
If you have a mechanical cable system, you should check if it is a No-Feedback (NFB) system.
- Standard Mechanical: If you let go of the wheel, the torque of the engine will cause the wheel to spin on its own.
- NFB Systems: These utilize a clutch mechanism in the helm. It allows you to turn the engine, but prevents the engine from turning you.
- The Stiff Factor: NFB helms are naturally slightly stiffer than standard helms because of the internal clutch friction. If you upgrade from a standard system to NFB, don't be alarmed if the wheel requires 10% more effort to turn, that is the "clutch" working to keep you safe.
7. The "Grease Melt" Protocol: Saving a Seized Tilt Tube
If your steering cable is seized inside the motor's tilt tube, 99% of people will tell you to cut the cable and buy a new one. But if you are in a pinch, you can try the "Grease Melt" protocol.
- Remove the Linkage: Disconnect the steering cable from the motor.
- Solvent Bath: Fill a spray bottle with a 50/50 mix of Acetone and Automatic Transmission Fluid (ATF). This is the most aggressive penetrating oil on earth.
- Thermal Expansion: Use a Heat Gun (never a torch!) to heat the outside of the steel tilt tube for 5-10 minutes.
- The Impact: Once the tube is hot, spray your solvent mixture into the ends. The heat draws the liquid into the microscopic gaps between the cable and the tube.
- The Persuasion: Use a wooden block and a hammer to gently tap the end of the steering rod. If it moves even 1/16th of an inch, you have won. Keep alternating heat, solvent, and tapping until the cable slides out.
8. Summary: The Connection Between Helm and Hull
Your steering system is the primary interface between your intent and the boat's action. A stiff helm is a clear warning sign that the "Mechanical Dialogue" is breaking down.
By understanding the difference between Cable Friction (Tilt Tube issues) and Hydraulic Compression (Air/Fluid issues), you can maintain a "One-Finger" helm feel for the life of your boat. Don't let a $2 tube of grease become a $2,000 repair bill.
I'll see you on the water.